Recent Posts

Related Posts Plugin for WordPress, Blogger...

Wednesday, March 28, 2012

Oven-Fried Parmesan Chicken

This recipe comes from my mom (which she got from her Better-Homes and Garden Cookbook), it's a keeper for sure! You can use any kind of chicken cut you'd like, but we love it with drumsticks. The chicken is dipped in an egg/milk mixture and then into a seasoned mixture of bread crumbs and Parmesan cheese and then baked! Ummmm! This is a great way to make an ordinary piece of chicken have some real flavor!

It's simple and easy to make, so I don't have much else to say, besides, enjoy!


Oven-Fried Parmesan Chicken
Printable Version
Yield: 12 servings
Ingredients:
2 eggs, beaten
¼ cup milk
¾ cup grated Parmesan cheese (real or powdered)
¾ cup dry bread crumbs
2 teaspoons oregano
1 teaspoon paprika
¼ teaspoon ground black pepper
5 pounds chicken pieces, skinned (breast halves, thighs, or drumsticks)
¼ cup butter or margarine, melted (optional)

Directions:
Preheat your oven to 375 degrees. Grease two large baking pans, such as 9x13 casserole dish. In a small bowl, combine egg and milk. In a shallow dish, combine Parmesan cheese, bread crumbs, oregano, paprika, and pepper.

Dip chicken pieces into egg mixture and then into crumb mixture and coat evenly. Arrange the chicken pieces in baking dishes, making sure the pieces don’t touch. Drizzle chicken pieces with melted butter (optional).

Bake for 45 to 55 minutes, or until chicken is cooked through and no longer pink (170 degree F for breasts; 180 degrees F for thighs and drumsticks). There is no need to turn chicken pieces during baking.

Suggestions for what to serve with this:
-Baked Potato
-Rice Pilaf
-Roll & Salad
-Steamed Broccoli

Recipe Source: Diana K. via Better Homes & Gardens

Thursday, March 15, 2012

Broccoli, Grape, & Pasta Salad


Being a pasta salad lover, when I saw this recipe on Pinterest it immediately made it on my dinners-to-try board. I just got around to trying it this week. Yum. I love it when I actually make/do something I see on Pinterest. It makes me feel so accomplished, even though I've wasted more time on there than I care to say. I love broccoli salad, and I love pasta salad. So, for me, this was a match made in heaven. The hubs doesn't love raw broccoli, or nuts, or grapes in his salad, so I was being selfish and kind of just making this for me, but it turns out he did like it! He even had seconds of this salad. I love the sweetness of this dressing with the crumbled bacon. It just works for me. Anyway, with the warmer weather we've been having here in Oklahoma lately, we paired this salad with some salmon and it was the perfect springtime supper! I think I'll see it popping up lots in our summer menu as well.


Broccoli, Grape, & Pasta Salad
Printable Version
Ingredients: 


1 cup chopped pecans
8 ounces farfalle (bow-tie) pasta (next time I’ll use the mini bow-ties)
1 pound fresh broccoli 
¾ cup mayonnaise 
⅓ cup sugar 
⅓ cup diced red onion
⅓ cup red wine vinegar
1 teaspoon salt 
2 cups seedless red grapes, halved 
8 cooked bacon slices, crumbled (or bacon bits)


Directions:


Preheat oven to 350°. Bake pecans in a single layer in a shallow pan 5 to 7 minutes or until lightly toasted and fragrant, stirring halfway through. You could also used sunflower nuts, or slivered almonds...whatever floats your boat. Prepare pasta according to package directions. Drain pasta and immediately rinse in cold water. Meanwhile, cut broccoli florets from stems, and separate florets into small pieces using tip of a paring knife. Peel away tough outer layer of stems, and finely chop stems.Whisk together mayonnaise and next 4 ingredients in a large bowl; add broccoli, cooked pasta, and grapes, and stir to coat. Cover and chill 3 hours. Stir bacon and pecans into salad just before serving.


Recipe Source: Adapted slightly from Southern Living via Pinterest
(P.S. go check out the original picture--it looks way better!)

Tuesday, March 6, 2012

Brazilian Feijoada {Black Bean & Meat Stew}


Feijoada (pronounced fezsh-wah-da) is a stew of beans and meat that is served in a Brazilian cuisine. This particular recipe comes some some of our friends, Danny & Marie. Danny is from Brazil and kindly shared this recipe with us. We were privileged to try it made by his wife, and now we're hooked! Often times when I ask Steven what he'd like on the menu, this dish is one he'll request.

It's amazing to me what flavor this dish has, the ingredient list isn't too complex, and the flavor is amazing. Cooked in a crock-pot, this dish is one of those easy, throw together meals that will please any crowd or company!

I am no professed Brazilian cook, but this Feijoada and Pão de Queijo (a Brazilian cheese puff bread) are two dishes that have been incorporated into our family menu that will stay forever! I will be posting hot to make Pão de Queijo in a few weeks, so stay tuned!


If you haven't tried Brazilian food, this is a great recipe to start with! And in the words of Danny, "Enjoy this manna from heaven (Brazil)!!!"


Brazilian Feijoada {Black Bean & Meat Stew}
(pronounced fezsh-wah-da)
Printable Version

1 pound dried black beans
1 pound diced ham (fully cooked)
1-2 pounds total 100% beef polish sausage, fully cooked (Hillshire Farms is a good brand)
½-1 yellow onion, diced
3-5 cloves garlic, minced
2-3 bay leaves
1 teaspoon salt

Rinse and sort beans. Soak beans in water, covering beans by 1-2 inches, overnight in 6 quart crock-pot. In the morning mix everything except the sausage, into the crock pot with water enough to cover ingredients by 2-3 inches. Cook on low for 4-5 hrs, adding water if needed. Slice sausage and to crock-pot, and cook for another 4-5 hrs. The longer it cooks, the softer and tastier it will be.

Remove bay leaves. If desired, thicken sauce by mashing or blending ½ cup of the beans, then add back into mixture. Serve Feijoada on top of rice. For the ultimate experience, heavily sprinkle the Feijoada with manioc flour (manioc flour is made from a South American root. The best source for manioc flour is a Latin American market/store. It may also be labeled tapioca flour, polvilho, yucca, or cassava flour. Manioc flour is gluten free.)

Recipe Source: Danny & Marie P., some of our dear friends

This is the original photo, new photos updated 4/6/16
It's fun to see how my food photography changes along the way. 

Wednesday, February 22, 2012

{My Favorite} Whole Wheat Bread w/ Tutorial

This post is a long time coming. I've been making my own bread for over 2 years now. I haven't bought a single loaf of bread from the store in that long, can you believe it? I can hardly believe it. But after finally perfecting what I was out to find, I can't go back.

When I first decided to start making bread I was on a quest for a recipe that was 100% whole wheat, used honey as the sweetener, and was soft even days after making it. I've always loved fresh made bread, but hated that if I stored it, it would be dry and crumbly two days later. I was determined that homemade bread existed that would stay soft and fresh for several days. And after much experimenting and recipe trying, I found it. The one. The only. Whole Wheat Bread recipe that I will ever make.


I've included all my tips and tricks in the notes and pictures below. I hope I've made this process easy for you to make, because now that I've figured this out, I think it's as easy as 1-2-3. There is no going back!

So my post here today is to share with you all that I know in hopes that it will be that easy for you. I think it will be. If you have questions....please leave a comment, I will respond promptly! If you are new to the whole idea of bread making this should still be easy enough, I've explained everything in as much detail as I thought would be helpful.

Fresh homemade bread is the perfect gift too! That is even more motivation to try it! Right?


{My Favorite} Whole Wheat Bread (see pics below for a quick tutorial)
Yield: 3 loavesLinkPrintable Version

*If you are new to bread making see notes below before beginning.

3 cups whole wheat flour (I use fresh ground whole white wheat)
¼ cup vital wheat gluten
2 tablespoons instant yeast (I use rapid rise -SAF brand)
2 ½ cups warm water
-----------------------------------------------------------------------
⅓ cup canola oil
⅓ cup honey
1 ½ tablespoons lemon juice
1 tablespoon salt
-----------------------------------------------------------------------
2 ½ - 4 cups whole white wheat flour

In a large mixing bowl (preferable Kitchen-aid or BOSCH mixer), add the 3 cups of flour, vital wheat gluten, and instant yeast. Mix until combined. Add in warm water and mix until smooth. Cover and let sit for 10 minutes.

After the above mixture has finished it’s 10 minute rest, add oil and mix. Next, add honey (in same measuring cup used for oil, so the honey will slide out nicely) and mix. Add salt and lemon juice and mix one more time to incorporate.

Finally, add the remaining flour. Add enough flour based on the texture of the dough. I usually add 2 ½ cups and mix for about 3 minutes, if the dough has pulled from the sides and is not sticking to the outer edges of the bowl, then that is plenty of flour. If it’s still sticky, I’ll add about 2 tablespoons of flour at a time until the dough has pulled away from the sides of the bowl and is all sticking together in around the kneading mixer. Continue kneading for 7 minutes (for a 10 minutes total knead time). Depending on the humidity and temperature of your environment will depend on how much flour you will need to add. The dough should have a somewhat tacky feeling, but if you push it around and try to form it it will hold it’s shape.

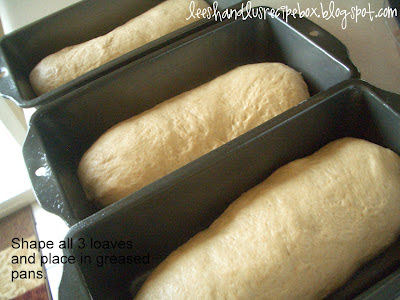
Spray your clean workspace with a light coat of spray grease, you can spray your hands a little too. This makes the dough so much easier to work with, and doesn’t add more flour by flouring the workspace. Place the dough from the bowl on the oiled surface. Divide into 3 even loaves (I like to weigh them). Press each section of dough into a disc shape that is evenly flat. Start rolling from one side and before you get to the middle fold in the edges and continue rolling to the other side. Pinch the dough closed on the seam and sides. Place in a greased loaf pan. Do the same with the other 2 loaves.

Cover loaves with a clean towel and let rise until 1 ½ to 2 inches above pan rim (30-60 minutes). Place pans in a cold oven, spaced evenly, and turn to 325 degrees and bake for 26-30 minutes or until done and golden brown.

When done, immediately pull out of oven and cool on a cooling rack until completely cool. If you leave it in the pan it will sweat and get soggy.

Recipe Source: adapted from cooks.com, and other bread making tips from Mel’s Kitchen Cafe

Notes:
  • I use 8 ½ x 4 ½ size loaf pans, this seems to make the bread the perfect size for fitting a sandwich into a sandwich-size Ziploc bag.
  • A flour measuring tip that I use (to produce tender bread that doesn't go dry in the cupboard) is to spoon the flour and lightly sprinkle it into the measuring cup, then level it off with a straight edge, such as a knife. If you scoop the flour and level it you often get more flour packed into the cup, and thus over-flour the dough. Over floured dough makes dry crumbly bread.
  • This bread freezes well. If you don’t over flour the dough (see tip above about spooning flour), then you can pull a frozen loaf out of the freezer, let it thaw, and you’d never known that the bread wasn’t freshly baked.
  • I always use whole white wheat. I grind it in a Nutrimill. You can also buy whole white wheat in many grocery stores (commonly found in a bulk foods section). I’ve used whole red wheat before, but it always produces dry bread for me. I like using red wheat in pancakes, waffles, etc.
  • Yeast does make a difference. If you use instant yeast it will be a lot faster of a process for rising. If you use regular yeast, you’ll need to proof the yeast in ½ cup of the warm water and let it get bubbly for 3-5 minutes. I prefer instant yeast.
  • If you are in a hurry and want your bread to rise faster turn the oven on for a few minutes and let it get a little bit warm, then turn the oven off and place the covered bread pans in the oven, this usually cuts the rising time in half.
Picture Tutorial:
I didn't include a picture for every single step in this tutorial. I've included the ones that seem crucial to making the perfect loaf of soft bread!

Some of the captions are harder to read than others, so I'll post the same thing above the picture.


I added about 2 tablespoons of flour and kept kneading for 30 seconds, the dough is visually stiffer and is cleaning the sides of the bowl. This is what we want! Depending on the humidity & several other factors you may need to add up to 1 1/4 cups more than those first 2 tablespoons. I usually start by adding 2 tablespoons of flour at a time, & judge the dough by look. It should clean the sides of the bowl, but will still be tacky to the touch, but if you were to pinch off a piece you could form it into a ball.


Your dough will not always weigh the same, but divide them into 3 equal size chunks.


Shape all 3 loaves and place in greased pans.


*****NOTE*****This photo says turn oven to 350, but it's supposed to say 325.....sorry for the typo.


Wednesday, February 15, 2012

Korean Glass Noodles - Jap-Chae/Chap Chae {A Korean Side Dish}

We don't have too many Korean recipes on our site yet. I'm working on learning how to make Korean food with my husband, and some of our friends! My husband served a two-year mission in Seoul Korea. So this is where our background for loving Korean food comes from. I had only tasted Korean food once before I married him, and now we've had it several times. I love how different Korean food is from American food. It amazes me how food is so different depending on what country you are in. I always feel like I've eaten healthier when I've had Korean food. One of our favorite dishes to make is Bulgogi {Korean Barbequed Beef}. We've been trying to branch out and make some of the side dishes that are often served with a Korean meal, this Jap-Chae is one of them.


The base of Jap-Chae is what is often referred to as "glass noodles". The noodles are made from sweet potato starch and the are clear after you cook them. They kind of have a grey-ish clear color before they are cooked. We buy them at an Asian food market in our city, I've never seen them at a regular grocery store. As the noodles cook, you'll chop several vegetables, including: carrots, mushrooms, garlic, spinach, yellow onion, and green onion. They vegetables are cooked and then added to the noodles along with some sesame oil and sesame seed. The interesting thing about this dish is that it's served cold. After you've mixed it all together you will chill it in the fridge for a few hours. I thought it sounded weird to eat cold veggies and noodles! But I was shocked at how much I absolutely loved this dish! The noodles are pretty fun to eat, they have a slight chewy texture and the flavor is great! I hope you'll enjoy this dish!

P.S. The leftovers are best served warm!

P.S.S. We've just learned how to make Kimchi from a very sweet Korean lady that lives near us. We'll post how to do this soon! It is so yummy home made, and we are so excited to finally know how to make it!

Korean Glass Noodles - Jap Chae/Chap Chae
Printable Version
Serves 6 as part of multi-course meal

½ pound dried Korean sweet potato noodles
2 ½ teaspoons sesame oil, divided
1 tablespoon olive oil
¾ cup thinly sliced onions
2 carrots, cut into matchsticks
2 cloves garlic, finely minced
3 stalks green onions, cut into 1 inch lengths
½ cup mushrooms, thinly sliced (shitake, wood ear) (you can use fresh or dried, see note below)
½ pound spinach, washed well and drained
2 tablespoons soy sauce
2 teaspoons sugar
1 tablespoon sesame seeds

Fill a large pot with water and boil. When water is boiling, add the noodles and cook for 5 minutes. Immediately drain and rinse with cold water. Drain again and toss with only 1 teaspoon of the sesame oil. Use kitchen shears to cut noodles into shorter pieces, about 8 inches in length. Set aside.

In a small bowl, mix soy sauce & sugar together. Add the olive oil in a wok or large skillet on medium-high heat. When the olive oil is hot, fry onions and carrots, until just softened, about 1 minute, stirring frequently. Add the garlic, green onions and mushrooms, fry 30 seconds, stirring frequently. Then add the spinach, soy sauce, sugar and the noodles. Fry 2-3 minutes until the noodles are cooked through (spinach will shrink down a lot). Turn off heat, toss with sesame seeds and the remaining 1 ½ teaspoons of sesame oil. Chill until cooled throughout.

This dish is traditionally served chilled, but is also good hot. The leftovers are best served warm.

Note: Rehydrate your mushrooms if you are using dried. Do this by soaking them in hot water in a covered bowl for 15-20 minutes.

Recipe Source: lightly adapted from Steamy Kitchen

Tuesday, January 31, 2012

Sadie's Dessert

A week or so ago I posted a how-to on chocolate curls. This Sadie's dessert here, is one of my favorite desserts to top with these decadent chocolate curls. This dessert has been around for ages, and is known by several different titles (Robert Redford Dessert, Mississippi Mud Pie, Layered-Chocolate Pudding Dessert, Chocolate Torte, etc.). This recipe is one I got handed down from my mother, who got it from her mother. I am sure if you've lived in America all of your life you've come across this dessert at some point. It seems that a simple dessert couldn't be so good, but it is. And that must be why it's been around for so long.


I emailed Mel, from Mel's Kitchen Cafe, a few months ago telling her that I made this dessert with her homemade pudding recipes with amazing results. Since she is more on top of it than me, she posted her version of this recipe last week. The original recipe from my grandmother calls for boxed pudding mixes, which work, but the homemade pudding adds so much more! The boxed pudding doesn't set up as firm as the homemade pudding so when you cut a piece it kind of slops and droops. But this amazing recipe from Mel for homemade chocolate and vanilla pudding was a hit. I especially loved the chocolate pudding it was so thick and rich (you melt chocolate chips into it....ummm!). This pudding can be made a few days in advance if you are wanting to make less work the day you want to serve it. Or if you absolutely refuse to make homemade pudding then use the small boxes of pudding mix.


If you haven't had this dessert before you'd better Pin It, bookmark it, or print it and add it to your "to try recipe list"!

Sadies Dessert
Printable Version

Crust:
½ cup butter, softened
1 cup flour
1 cup chopped nuts (pecans or walnuts are best)

Place flour in a small mixing bowl and cut in butter with pastry blender or fork. When butter is distributed through stir in chopped nuts. Press crust mixture into a 9x13 size pan and bake at 350 degrees for 9-10 minutes, until set. Let cool.

1st layer:
1 cup powdered sugar
8 ounces cream cheese, softened to room temperature
1 cup whipped cream (or you can use cool whip as a substitute - I prefer whipped cream)

In a medium size bowl whip cream until stiff peaks. In a separate bowl whip cream cheese with powdered sugar until there are no lumps. Mix in whipped cream until smooth. Spread this mixture over the crust.

2nd Layer:
2 cups homemade chocolate pudding (or 1 small pkg of instant chocolate pudding - mixed with 2 cups milk)
2 cups homemade vanilla pudding (or 1 small pkg of instant vanilla pudding - mixed with 2 cups milk)
(Note: if you don’t feel like making 2 kinds of homemade pudding use 4 cups of just chocolate pudding.)

I like using the homemade pudding because it sets up more firm, resulting in a prettier served piece of dessert. Mix the chocolate and vanilla homemade pudding (at room temperature) together and spread over the cream cheese layer. (Or if you’d rather use instant pudding for a quicker process mix the chocolate and vanilla instant pudding packages with 4 cups milk and spread over cream cheese mixture).

Finally, top with more sweetened whipped cream, about 1 ½ cups is good. And top with chocolate curls for a more gourmet look (or chocolate sprinkles or just plain, it will taste great whichever way you pick)

Recipe Source: My grandmother, Rosella B.

Friday, January 20, 2012

{How to Make} Chocolate Curls

If you want to feel fancy, here is a one way to do so......make chocolate curls! These chocolate curls really add a lot to a dessert or they are just plain fun to eat. I love the way they melt in your mouth! So yummy! The best part about these curls it that they are so simple to make, you really can't mess up. Below I have a pretty thorough step-by-step (with pictures) instructions on how to make them. I hope you'll have fun fancying up your dessert dishes!


Chocolate Curls
Printable Version

I actually don't really follow a recipe for this, but in case you want one here it is:

3 ounces chocolate, (one baking square) or chocolate chips
2 teaspoons coconut oil (for better taste use coconut oil, if you don't have any you can use Crisco)

***I usually just throw some chocolate and coconut oil and melt it....I haven't messed it up without following a recipe.

First place a dinner sized plate in the fridge, you'll see why later on. Place chocolate and coconut oil/Crisco in a microwave-safe bowl and microwave in 30 second increments until chocolate and coconut oil/Crisco are melted smooth.

Pour chocolate on a back-side of a metal cookie sheet (or a non-rimmed metal baking sheet) and smooth it out with a spatula or scraper, or knife, etc until it's very thin. Place the sheet in the freezer for a few minutes. To test for done-ness, use the finger print test, if you touch the chocolate with your finger and it leaves an indent of your fingerprint, wait a few more minutes.

With a metal or hard plastic spatula (I use a plastic Pampered Chef pan scraper - because I've got metal shavings in with my chocolate scraping a metal pan with a metal spatula.) start scraping the chocolate from the cookie sheet. If it's too frozen/hard then it will just crack and crumble, so wait a minute and try again, when it starts curling you have a few minutes before it will be too soft again, when it stops curling cause it's too soft then put in the freezer for a minute or so and go at it again.

When you have all your curls scraped from the cookie sheet, place them on a cold plate and refrigerate until hardened. Place curls in the fridge until use or you can freeze them in a freezer bag and use them whenever you'd like.

Garnish cakes, pies, and other desserts with these delectable and fancy curls!

Recipe Source: slightly adapted from The Pioneer Woman

Spread the chocolate thin, I like using a Papered Chef pan scraper
Test it with your finger to see if it's done, if you have a wet chocolatey finger print stick in back in the freezer for a minute or two. You should only have the slightest indication of a fingerprint when you touch it.
If it's too hard, it will crack when you try to scrap the curls away....like so
Still just barely too cold and hard
Ahhh, perfect, now they are curling just right.
Work quickly and if it stops curling nice,
just put it back in the freezer for a minute or two and try again.
Place all the curls on a cold plate and then refrigerate them until they are hard and you are ready to use them. If you want to save them for later stick them in a freezer bad after you've refrigerated them and they are nice and hard and then pull them out of the freezer to fancy up whatever dessert you are making.
Here is my evidence of the metal shavings on my chocolate curls. To avoid this use a metal pan and plastic scraper or the bottom of a plastic tray and a metal spatula. The metal on metal seems to always result in metal shavings on my curls, and I'm thinking that really is not healthy to ingest. :)
Featured Desserts:

Chocolate Fudge Cake with Chocolate Curls
Sadies' Dessert....will be posting this soon, it was featured today on Mel's Kitchen Cafe, one of my food blog heros, if you'd like to check it out.

Link