Recent Posts

Related Posts Plugin for WordPress, Blogger...

Saturday, April 16, 2011

Sourdough Start {starting your own}

I have a few recipes that I'll be posting shortly that call for sourdough starter. They are so yummy, I hope you'll make you a start and be prepared to try some yummy goodness over the next few weeks.

The sourdough starter I have is well over 50 years old. My mom got it from a lady in our neighborhood, she got it on her LDS mission to Alaska. As long as you keep using it and feeding it, it will last a really long time. My mom has had her same start for over 16 years. I've had mine (part of hers) for about 3 years.

My start is getting pretty big, so if I have any takers that want to come and get some. I'd be happy to share it. Since I can't share my start with everyone, I found this great recipe for starting your own from King Arthur Flour, I will post it below. It's pretty simple. And all you do when you use it is feed it some water, flour and then stir it until it's smooth. It's not complicated at all - so don't be scared!

Sourdough Starter {starting your own}
King Arthur Flour

2 cups warm water
1 Tbsp sugar or honey (optional) (don't use honey if you will be feeding to infants under 1)
1 Tbsp or packet active dry yeast
2 cups All-Purpose Flour

Pour the water into a 3- to 4-quart glass or ceramic container or bowl, and add dissolve the sugar or honey and the yeast in that order. Stir in the flour gradually. Cover the jar or bowl with a clean dishcloth and place it somewhere warm. By using a dishcloth instead of plastic wrap, you'll allow any wild yeast in the area to infiltrate and begin to work with the domestic yeast which itself is beginning to develop "wild" characteristics and flavors.

The mixture will begin to bubble and brew almost immediately. Let it work anywhere from 2 to 5 days, stirring it about once a day as it will separate. When the bubbling has subsided and a yeasty, sour aroma has developed, stir your starter once more and refrigerate it until you are ready to use it. The starter should have the consistency of pancake batter.

Notes:

-If you've ever had a start of Amish Friendship bread, this is really similar, so don't be scared to try it.

-The things we make the most with our start is waffles.

-The starter does thin out after it starts producing it's own alcohol. Mine is about the consistency of heavy cream.

-Most recipes call for about 1 cup of starter. After you've taken the cup of starter from your jar, you'll add 1/2-1 cup of water (start with 1/2 cups, you just want it the consistency of a thick pancake batter) and 1 cup of all-purpose flour to feed it. You'll stir it together with a wire whisk until smooth let it sit on out for and refrigerate. You should use the starter every few weeks. It does separate in the fridge and can turn a dark grey on the top - that is my cue that I need to use it soon. I know that if it ever turns pink/red, I need to throw it out and start a new one (which hasn't happened to me yet).

Thursday, April 14, 2011

Jazzed Up Ramen Noodles

My husband travels quite a bit for work and I find myself not wanting to cook for myself. I loved Ramen Noodle Soup as a kid - I bought some recently and tried it the way I liked it as a kid - YUCKO! Well, my husband served his mission in Korea and they have much better Ramen noodles there (which can also be bought in several grocery stores). So anyhow, with his missionary experience he learned how to jazz up a simple dish like Chicken Ramen Noodles. So that's what I had for dinner tonight. I know it's not fancy - but at least I got some protein for dinner!


Jazzed Up Ramen Noodles
Steven G.
Serves 1

1 package ramen noodles (1/2 the seasoning packet)
2 green onions, chopped
2 eggs
1 cup water
Dash or two of cayenne pepper

Bring water to boil with onion and eggs, as soon as it starts to boil scramble egg up and add the noodles. Cook for about 2 1/2 to 3 minutes, until noodles are done to your liking. Remove from heat and stir in 1/2 the seasoning packet and a dash or two of cayenne pepper.

Wednesday, April 13, 2011

Breadsticks

I love this recipe. It's so versatile. Our favorite thing to go along with any pasta dish is breadsticks. I love these breadsticks because they are tender, buttery and have the perfect touch of garlic salt and cheese. I know people rave and rave about Olive Garden's breadsticsk....blah....these top those by far. My mom made these for us growing up and we each got 3 (8 people in our fam and 24 breadsticks per batch) - now that I have my own little family, we can eat pretty much the whole pan (not that we should - but we usually do).


This breadstick recipe works great for pizza crust - or a rolled out type bread topped with cheese and cut into sticks. Try it out!

Breadsticks
Printable Version
From Diana K.
1 1/2 cups warm water
2 Tbsp white sugar
1 Tbsp instant yeast (I use SAF brand instant yeast)
1/2 tsp salt
3 - 3 1/2 cups all-purpose flour
Butter/Olive Oil/Garlic Salt/Parmesan or Asiago Cheese/Parsley

In mixing bowl add warm water, sugar and instant yeast. Let sit for 3 minutes or so until sugar and yeast are softened. Since it's instant yeast there is really no need to let it proof like regular yeast (if all you have is regular yeast - let it sit for 10 minutes or so until it's slightly bubbly).

Add salt and flour and knead in mixer for 3 minutes or by hand for 8-10 minutes. You want the dough to pull away from the sides of the bowl or counter (just don't over flour the dough or they turn out a little dry and chewy. You'll know the dough is floured well when it pulls from the sides and still has a slight tacky touch to it.

Place dough on lightly floured counter top or bread board and cover with a clean towel and let it rest for 10 minutes.

To make breadsticks:
Roll dough out into a rectangle shape the size of a large cookie sheet. Cut into 24 sticks with a pizza cuter. Melt 3-4 Tbsp butter and pour and evenly spread on cookie sheet. Dip each breadstick on both sides in the butter and twist. Sprinkle with garlic salt, Parmesan/asiago cheese, and parsley. Bake in preheated 400 degree oven for 12-15 minutes or until golden brown.


To make mini-size or regular-size pizza crust:
For mini: divide dough evenly into 6 sections and roll out into round pizza crust. For regular size crust: divide dough into 2 sections and roll into square or circle - place on silicone baking mat (this is one kitchen gadget you are sure to love) and bake on cookie sheet, or on a pizza pan/stone. Drizzle with olive oil and spread evenly coating the crust and then sprinkle with garlic salt. Bake in preheated 425 degree oven for 10 minutes. Add pizza toppings of choice and bake extra 10 minutes.
Mini-Pizza

Regular Size Pizza (rectangle style)
To make Cheesy Bread:
Make the same as the pizza crust except after you do the first baking put a layer of freshly grated Parmesan cheese, mozzarella cheese, and a sprinkle of Italian seasoning or basil and garlic salt. Bake 5-8 more minutes until cheese is melted and bread is browned.

Tuesday, April 12, 2011

Sugar Cookies {to go along with Glacé Icing}

*Note Added 6/2/2011: I've had a few people ask about my CTR shaped cookie cutter, look below for pictures and an explanation of how it was done.

Some people like sugar cookies soft and others like a harder cookie. I like both. Here is a recipe for a great crisp and buttery sugar cookie. But they can also be made thick n' chewy - just depends on how thick you roll out the dough (and the baking time will vary just slightly depending on how thick you roll them out).

I used this recipe to make my CTR cookies with Glacé Icing - I rolled them thin. And the recipe made 30 CTR shaped cookies. So that just gives you an idea of how much dough you'll want to make.


Sugar Cookies

1 cup real butter (no substitutions!)
1 cup granulated sugar
1 large egg
1 1/2 tsp extract (almond, vanilla, etc - use same extract flavor in Glacé Icing)
3 cups flour
1 1/2 tsp baking powder
1/2 tsp salt

Cream butter and sugar until light and fluffy- about 2 minutes. Add in egg and extract and mix thoroughly.

In a separate bowl combine flour, baking powder and salt. An important note: It’s critical to measure your flour correctly or you will end up with a dry, crumbly dough/cookie. Never use your measuring cup to scoop up flour. Use a spoon and spoon the flour into the cup and then level it off with a flat edge.

Add the flour mixture to the creamed butter mixture and mix until combined.

Chill the dough in the fridge for about an hour, or use this great tip from ourbestbites.com to make things easier:

When your dough is made, instead of putting it in the fridge, immediately roll between 2 sheets of waxed or parchment paper and then place on a flat surface in the fridge. Chill for about 20-30 minutes and then start cutting it out. This way it chills faster and the bonus is that you don’t need to add extra flour to roll it out. If you don’t use this tip, proceed as follows:

When you’re ready to roll out dough lightly sprinkle flour onto your work surface and roll out dough with a rolling pin.

Bake at 350 for 8-12 minutes. The baking time depends on how you like them. If you like them thick and chewy then 8-9 minutes does it. If you like them crisp and buttery, then 10-12 minutes does the trick.

Cool before frosting! Enjoy!

Recipe Source: www.ourbestbites.com

CTR-Shaped Cookie Cutter
My mom is a clever lady and she made this CTR-shaped cookie cutter. I haven't been able to find one online that you can buy, but if anyone finds one and wants to share in the comments, we'd love to know.

My mom took a small pineapple tid-bits can that was about 2 inches tall and cut both ends off of it. Then with some pliers she bent it into the CTR shield shape.


Saturday, April 9, 2011

Glacé Icing

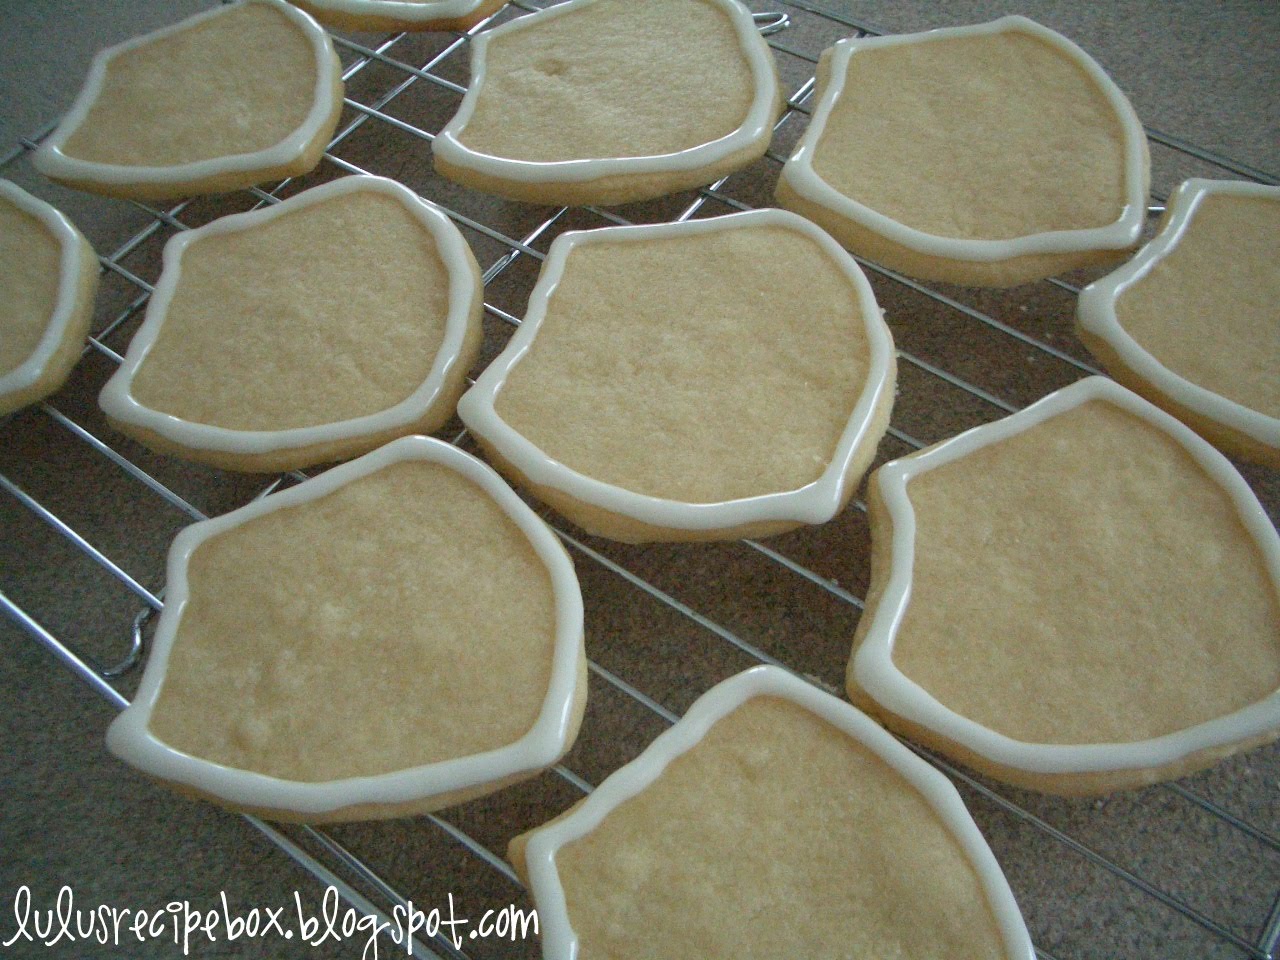
My nephew got baptized this afternoon and I just HAD to make these cookies. My mom made CTR shaped cookies for us kids when we got baptized and I thought it'd be fun to give them a try. Knowing I am not a very good froster, I called my mom to ask her what frosting recipe to use. She directed me this glacé icing recipe. I was really hesitant to try this because she can make everything look perfect, and I wasn't sure I could even come close. But she convinced me it was easy and slick - and it most definitely was! So I hope you'll try it too. (I made these on a harder sugar cookie, but would imagine it'd work about the same on a soft cookie.)

This icing is perfect for decorating any shape of sugar cookie. You can dip the cookie and let the icing drip off through a wire rack. Or you can pipe a thick edge that acts like a dam and then fill in the middle with the glaze in your color of choice and then pipe on words or designs. The icing dries quite hard over night and then you can stack the cookies without them leaving marks on the underneath layer. Pretty cool, huh?

Glacé Icing
From ourbestbites.com
1 lb. powdered sugar (about 3 3/4 C)
6Tbsp milk
6 Tbsp light corn syrup
1 t extract (almond, vanilla etc. keep in mind that if you use brown colored vanilla it will tint the frosting slightly)

With a whisk, combine sugar and milk until smooth and has no lumps. Stir in corn syrup and extract. This consistency is what you want for the glaze - it is nice and runny and pours our of your spoon quite fast. Pour how much you want into a separate bowl for the glaze - then you can tint it the color(s) you want.

Set aside the amount you want for the piping. For piping you want to add more powdered sugar - a few tablespoons at a time, until it's thick and pours from a spoon slowly. You can't really mess it up. If it's too thin then add more powdered sugar. If it's too thick just add more milk until it's right consistency. If you want to color your piping do so after it's as thick as you want. Put it in a frosting tube and you're ready to go.

You'll want to pipe the dam like edge after your cookies are completely cool, like the picture below. Before you add the glaze let this piping harden until you can touch it without leaving a fingerprint (about an hour).


Then you'll fill in the center with your colored glaze (it works great with a baby spoon). Let this glaze harden too before adding words. You can add designs or words when it's wet, but they will sort of bleed and blend into each other.


Then pipe on letters or designs and let harden over night on a partially covered cookie sheet. That way the bottoms of the cookies don't dry out. In the morning the cookies should be set hard enough for stacking without denting.


Other fun cookies that we've done with Glacé Icing since the CTR design are:

Volleyball Cookies
These were made by my Mom for my sisters last Volleyball game of the season.

Spider web cookies

Friday, April 8, 2011

Cheesecake Cups

I {heart} cheesecake! Baked or chilled, I love it the same. This recipe is one that my mom made since before I can remember. I love it just as much now as I did when I was a kid. It's so easy, so fast, and they just are so cute and tasty. I know you won't be able to resist making these cute little cups! Enjoy!


Cheesecake Cups

Diana K.

Cheesecake Mixture:
1 (8 oz) package cream cheese, softened to room temperature
1 cup whipping cream, whipped
1 cup powdered sugar

Crust:
1 package graham crackers *see note below for gluten-free option*
1/4 cup sugar
1/4 cup butter, melted

12-13 cupcake liners
Favorite Jam or Berry Mixture

Set cream cheese out to soften to room temperature. Put a metal/glass bowl in the freezer with your beaters in it. The frosted bowl and beaters help to whip the cream up fluffier.

In the bowl that you froze for the whipping cream - whip up the cream until light and fluffy. In separate bowl whip up softened cream cheese with beaters, whip until smooth and fluffy. Transfer whipped cream to the bowl with cream cheese and add the powdered sugar. Mix until smooth.

In a gallon-size zip-lock bag, place the package of graham crackers - roll with rolling pin to crush (or you can grind them with a food processor, etc). In a bowl add crushed graham crackers, melted butter, and sugar. Toss with fork until the crackers are evenly coated with butter and sugar.

You'll need a muffin-tin that holds 12 cups and also a small dish or custard cup for one extra one. It really is hard to make this into 12, so you'll get a baker's dozen (13). Line the tin and cup with cupcake liners. Spoon the cheesecake mixture into the liners until they are about 2/3 to 3/4 of the way full. Spoon the graham cracker crust onto and press gently with the spoon. Freeze in for 2-3 hours. When you are ready to serve them just turn them upside down onto your serving dish and peel off the cupcake liner. I love to eat them frozen. If you want them thawed, they are good this way too. Make sure to take the liner off before they thaw - it's hard to take the liner off when they are thawed. Top with your favorite jam or berry mixture.

Gluten-Free Option: Instead of using graham crackers, use crushed up rice chex cereal. It works great! Use about 2 cups of crushed cereal. Also make sure your cornstarch is gluten-free. Mine is.

Berry mixture recipe:
1 1/2 cups berries (raspberries or strawberries work great), smashed slightly
1/2 cup sugar
1/4-2/3 cup water
1 Tbsp cornstarch

In sauce pan combine sugar and cornstarch, mix until the cornstarch is evenly mixed into the sugar. Add water and smashed berries. Turn heat on stove to medium-low. Heat thru and let it bubble and thicken. If it gets thicker than you want add a little more water (1/2 Tbsp at a time).

The cups before the crust is added


The yummy, buttery crust mixture

All ready to freeze

The finished product! Ready to be indulged

Saturday, April 2, 2011

French Toast {Cooked in Coconut Oil }


We usually cook a hot breakfast on Saturdays. Mostly because my honey is not waking up at 5:00 to get ready for work. If I was the best wife ever, I'd get up at 5:00 and make him a hot breakfast every morning........we'll see if that ever becomes a habit. Anywho, French Toast is a favorite for breakfast - especially with these few little tweaks from your average french toast recipe. The coconut oil, cinnamon and vanilla are enough to knock your socks off, and get you moving any morning.

French Toast
By: Lindsay G.

6 slices of bread
4 eggs
3/4 C. milk
1 tsp. vanilla
1 tsp. cinnamon

Coconut oil
Maple Syrup

Preheat square skillet on stove over medium-low heat or a electric skillet. In a shallow and open dish, combine eggs and milk. Whip together with a fork until egg is well blended. Add vanilla and cinnamon and stir until mixed well.

Melt coconut oil over pan and spread around evenly. Make sure the pan isn't too hot so it doesn't pop oil and burn you. Dip bread on both sides into egg mixture and cook on both sides until golden brown.

Serve with butter or more coconut oil and maple syrup.