Recent Posts

Related Posts Plugin for WordPress, Blogger...
Showing posts with label Christmas. Show all posts

Wednesday, December 14, 2016

French Toast Bake


If you don't already have a breakfast planned for Christmas morning, this French toast bake is awesome and you can make it all the day before or right before....whichever fits your fancy.  We're sharing the recipe on Rhodes Blog today. 


Head to the Rhodes bread blog to get the full recipe.

Tuesday, March 1, 2016

Chewy Andes Mint Chocolate Chip Cookies


When I think of St. Patrick's day, green obviously comes to mind. And I'm a huge fan of no food coloring added as much as possible.  So when I'm coming up with a St. Patrick's day menu, I'm looking for things that are edible looking. No green pancakes, no green eggs and ham.  I have to be able to want to eat it when I look at it.  These Chewy Andes Mint Cookies are right up my alley of ok (green-ish, they really don't have a ton of green in them, just bits of Andes mint pieces) food to eat. Chocolate mint screams St. Patty's day to me. You? 


These also make a great holiday cookie around Christmas time too!


These cookies are seriously amazing! Just check out what's in them!

First is the blended oats.  Blending up the oatmeal gives you the chewiness that only oatmeal can add to a chocolate chip cookie, but with a smoother texture that makes for a pretty and irresistible cookie.   


The second thing that makes these different than your average chocolate chip cookie is the grated chocolate bar.  I can't even find words to explain it, but it makes these cookies exponentially better.  More chocolate in every bite is never a bad idea.  Just try it and you'll understand.  It also doesn't hurt that this makes one GIANT batch of cookies-perfect for gifting to neighbors, saving cookie dough for snitching, or storing baked cookies in the freezer for unexpected guests!

These cookies got rave reviews at both of our houses!  Santa or Mr. Leprechaun is sure to love them, too! 


Chewy Andes Mint Chocolate Chip Cookies

Printable Version
Ingredients:

2 cups butter
2 cups granulated sugar
2 cups brown sugar
4 eggs
2 teaspoons vanilla
2 teaspoons baking soda
2 teaspoons baking powder
1 teaspoon salt
4 ½ cups all-purpose flour
5 cups oatmeal, blended (measure before, then blend in blender until powder)
1 ¾ cups Andes mint pieces
1 ¾ cups dark chocolate chips
3 cups chopped nuts (pecans or walnuts, optional)
1  (6-8 ounce) chocolate bar, grated
Sea salt for sprinkling

Notes:

I added ½ cup extra flour to the original recipe b/c we are at about 5,000 feet above sea level.  If you are below 5,000 feet you can probably get away with 4 cups of flour.

Directions:

Preheat oven to 375 degrees. Line baking sheets with parchment, silicone baking mats or just on the cookie sheet (un-greased is fine).   

Cream butter and sugar on high in a mixer for 3 minutes, until light creamy. Add eggs and vanilla, mix one more minute. Measure 5 cups oats into a blender jar and blend until a fine flour.  Mix all soda, baking powder, salt, flour, blended oats together in a large mixing bowl. Add the dry mixture to the butter/sugar mixture. Mix together and add Andes mint pieces, chocolate chips, grated chocolate bar and nuts, mix until combined.

Make golf ball sized cookies place 2 inches apart. Bake in preheated 375 degree oven for about 6-8 minutes.   Let cool on a cookie sheet for 2 minutes and the on a wire rack until completely cool.  Store in an air-tight container. Freeze for longer lasting cookies. Makes 112 cookies.

Recipe Source:

Slightly adapted from a recipe from our grandma and mom - added Andes mint pieces, ½ cup flour, and sea salt. Originally posted on Eigtheen25.

Friday, December 18, 2015

Traditional Wassail {the one and only receipe you need}


Wassail reminds me of Christmas a lot. My mom used to make wassail for us as kids around the holidays. The warm drink smells so good and reminds me of home, warmth, family and Christmas time.  The smell of apple cider, cranberry juice, and spices simmering in a pot (or crock pot) is like pure heaven. No candles or real tree needed to fill the house with amazing aromas. 

When my husband and I were dating and engaged we started attending the same church (ward) and come to find out, a hysterical man (Mike) that I knew from a mutual friend was one of the counselors in our bishopric.  He was good friends with my husband and his brother, Russell.  Over the course of conversation that winter we found out he had a marvelous wassail recipe.  My husband recalls his brother, Russell making Mike's recipe, and enjoying it thoroughly.  So we were after the recipe.

Last year I emailed Mike to get his recipe.  He sent it to me in the mail along with this intriguing story about where "wassail" comes from.  This history makes that wassail even more enjoyable to make!

Here is what Mike wrote to us: 
"The word "wassail" presumably comes from an Old English custom known as "wassailing", which was celebrated the night before the winter solstice (Dec 21, in the northern hemisphere). On that darkest night of all the year, the villagers ventured forth into the orchards and fields to toast to the good health of the trees, crops and each other. Of course, to really get into wassailing and wander around in the frigid darkness risking attach by vampires, werewolves or Jack the Ripper, which were known to inhabit the English countryside in those ancient days, it would help to have had several tankards of wassail. Back then the drink was made of liberal doses of ale, cream, eggs, pieces of apple, berries and...who knows what else. One thing is certain: the drink would not have included any citrus juice as many trashy, cheap, modern-day imitation recipes for "wassail" insist upon. Orange and lemon trees have never done well in Britain's fog, rain and cold temperatures. So with that short bit of dubious gastronomical history, let me proceed with the only true wassail recipe that has been personally approved by His Eminence, The Most Reverend and Right Honorable Lord Archbishop of Canterbury."

I have to say that this explanation makes this wassail the only legitimate one I could possibly lay my hands on.  Aren't you convinced this is the real deal?   After enjoying several mug fulls of this last winter, I'm convinced this is the only warm holiday drink that needs to be made.  It trumps hot cocoa and peppermint tea, no doubt!  

Thanks for the great history and wonderful recipe, Mike!  
Also, in case you are like my and don't drink alcohol and might now where to find this mixer.  Here is a picture of it. See the recipe notes as to where to find it in the store.


Without further adieu, here is the beloved recipe: 

Wassail

Ingredients:

2 quarts apple cider (best variety possible (not apple juice)).
1 pint cranberry juice cocktail
½ to ¾ cup sugar (pick your sweetness)
1 teaspoon Angostura brand aromatic bitters
2 cinnamon sticks
1 teaspoon whole allspice
1 teaspoon whole cloves
1-2 oranges, rind and pith cut off (all the white pith needs to be removed so you don’t have a bitter tasting wassail)
Cheesecloth, clean nylon or a tea ball


Notes:

- for the apple cider: if you can find a variety from a nearby orchard, that would be best, if not Simply Apple juice brand works well.  
- Angostura brand aromatic bitters - this is a flavoring like peppermint or vanilla, it can be found in the grocery store near the mixers such as Bloody Mary mix, etc.  A small bottle will last a long time and it is really essential to the taste of the wassail.
-If you want it alcoholic I’ve been told that 1 cup of Myers Dark Rum goes well mixed in with everything.
Directions:

Combine apple cider, cranberry juice cocktail, sugar, and aromatic bitters in a pot or slow cooker.  Place whole spices in a piece of cheesecloth, clean nylon, or teaball with the ends secured up so you don’t have to strain them out when it’s done.  Place the peeled (and pith free) oranges in the pot/slow cooker and simmer for at least 2 hours (do not boil). Turn crockpot to high.  Once it’s simmered or cooked in a crock pot for 2 hours turn the heat to low to keep it warm and enjoy the drink all day. Store any cooled leftovers in the fridge and reheat to serve again the next day.

Recipe Source:

From a good family friend, Mike Stauffer.

Friday, December 11, 2015

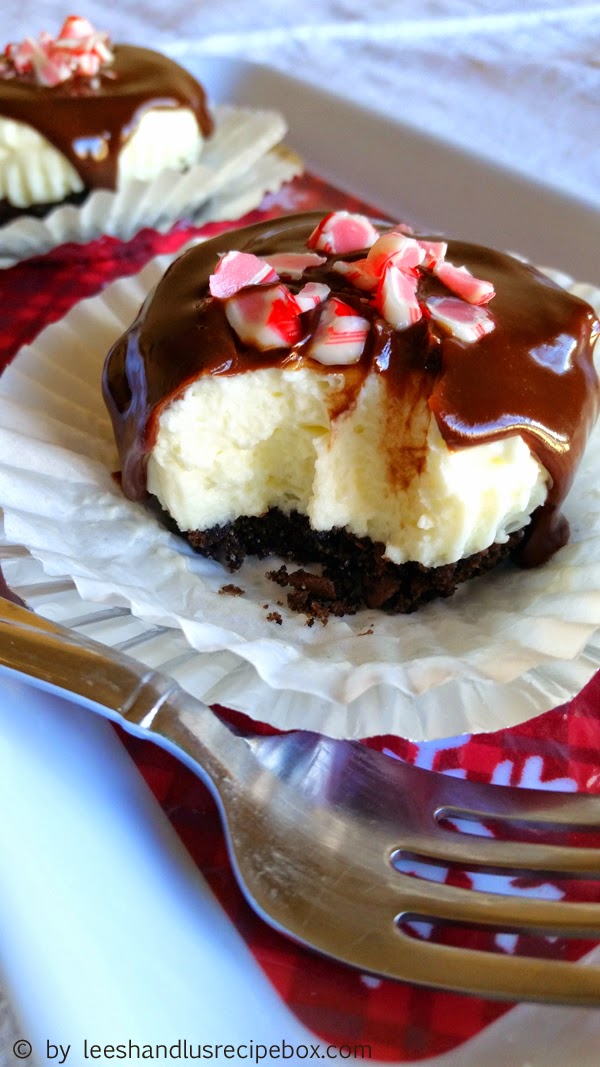
Mini No-Bake Peppermint Cheesecakes

Looking the the perfect holiday dessert?  These are cool, creamy, and dreamy.  They scream Christmas to me.  
   

They are quick and easy to put together and can be made ahead of time, yet are sophisticated enough to serve to dinner guests.  The huge bonus: you don't even need to turn your oven on! Chocolate and peppermint is a match made in heaven and these are sure to be devoured by kids and adults alike.


The warm peppermint-spiked ganache is what really puts these over the top.   Try them at your next holiday get-together.  You won't be disappointed! 


No-Bake Mini Peppermint Cheesecakes

Ingredients:


1 (8 oz) package cream cheese, softened to room temperature
½ pint whipping cream, whipped until soft peaks form
1 cup powdered sugar
4-5 drops peppermint oil or 2 teaspoons peppermint extract

For the Crust:
1 ½ cups crushed chocolate cookies--oreos, teddy grahams, chocolate animal crackers
1/4 cup sugar (If using oreos, cut the sugar to 2 tablespoons)
1/4 cup butter, melted

For the Ganache:
⅔ cup whipping cream
1 cup (6 ounces) semi-sweet chocolate chips
½ teaspoon peppermint extract, or 2 drop peppermint oil (optional)

Directions:


Line a 12 cup muffin tin.  Set aside.  In a medium-sized mixing bowl combine whipped cream, softened cream cheese, and powdered sugar.  Beat until smooth.  Add peppermint oil or extract.  

In a separate bowl, combine crushed chocolate cookies, sugar, and melted butter.  Mix until incorporated.  Spoon cookie mixture evenly into the bottom of the liners.  Use a small cup to pack the mixture in.  

Spoon cheesecake mixture over packed crust.  Spread and smooth to remove air bubbles.  Freeze at least 2 hours.  If freezing longer, cover with foil.  

Allow cheesecakes to sit at room temperature for at least 10 minutes before serving.  While cheesecakes are thawing, make the ganache.  In a small saucepan over low heat, heat whipping cream until just boiling.  Remove from heat and add chocolate chips.  Stir until smooth and melted.

To serve, remove cheesecakes from liners while they are still frozen.  Top with ganache and crushed candy canes, if desired.

Notes:


It really doesn’t matter if you put the crust or the cheesecake mixture in the liner first.  Putting the crust in first makes it easier to pack, but putting the cheesecake first makes it easier to invert and serve.  

These are also delicious served with York Dark Chocolate and Peppermint Sundae Syrup in place of ganache.


Wednesday, December 24, 2014

Merry Christmas

We wanted to wish you a Merry Christmas!  We hope you have a wonderful holiday and that you get to spend it with those you love, and that you get to eat lots of good food!  

Thanks for supporting us in our blogging adventure this past year. We're almost at year 4 of sharing recipes here at Leesh & Lu's Recipe Box.  It's been a fun few years! We hope you have enjoyed the recipes we've shared.  We enjoy sharing them with you!  Having followers makes this fun!  We love good food and can't help but share it! 

We are thankful for all we have. For our family, friends, and most important our Savior Jesus Christ.  Christ is the most wonderful gift of the season.  

Merry Christmas from Leesh....
 and Merry Christmas from Lu! 


Friday, December 12, 2014

Merry Berry Salad


Isn't this salad pretty?  I love how pretty it is!

This is one of my favorite salads and it's perfect for the Holidays. My mom has been making this salad for several years now. If I remember right she first made it to take the their annual Christmas party that they do with their college friends.  I love that they still keep in touch!  I think it's so awesome. But since this salad made it's first debut in the family, it's been coming back again and again.  

It really could be made year round, but it seems seasonal with the dressing that is loaded with fresh cranberries. Isn't the color wonderful? It's not only beautiful, but super delicious.  

It comes together rather fast.  You can buy a pre-bagged salad mix or wash and prepare your own.  We enjoy it with Romain and red/green lettuce.  The apples (or strawberries or blueberries) really add some pretty color to the salad, and so do the dried cranberries.  I'm a fool for fruity salads! The dressing is easy to whip up. It calls for fresh cranberries and some thawed apple juice concentrate. We've found that buying it in the handy Langer's brand bottles makes it easy to use a small amount at a time and save (it comes in a clear plastic bottle with screw on lid). 

I hope you will enjoy this salad this holiday season!

Merry Christmas!
  
Merry Berry Salad
Ingredients:

1 head of romaine or green leaf lettuce, washed, and chopped
1 honeycrisp or other sweet apple, diced into bite size pieces
1 green apple, diced into bite size pieces
½ - ¾  cup Parmesan cheese, grated
½ cup dried cranberries
½ cup sliced or slivered almonds, toasted
(you can also use other berries, like strawberries and blueberries if you don’t want apples)

Dressing:
½ cup fresh cranberries
¼ cup white sugar
¼ cup apple cider or red wine vinegar
2 tablespoons thawed apple juice concentrate
½ teaspoon salt
½ teaspoon ground mustard
¼ teaspoon onion powder
½ cup canola oil

Directions:

In a small skillet heat over medium heat and add almonds. Toast by stirring them constantly until slightly browned, 3-5 minutes. Set aside to cool before placing on the salad.

Wash and spin salad and place in a large serving bowl.  Top with grated parmesan cheese, as much as desired (½ - ¾ cup about).  Next you’ll arrange the other salad toppings in rings around the bowl. Chop apples  (toss in a small amount of lemon juice if you won’t be serving soon, to prevent browning) and arrange in a ring around the outside or the bowl (see picture in post), then arrange the cranberries around the bowl just inside the apples. Next place the almonds in the center.  Wrap with saran wrap and place in the fridge if not ready to eat right away.

With an immersion blender or regular stand blender. Add all the dressing ingredients except the oil and blend til smooth, slowly add the canola oil in a small drizzle to the mixture and blend til smooth and creamy looking.  Refrigerate until ready to serve.  Toss salad with dressing before serving.  

Recipe Source:

Slightly adapted from Diana K., who got it from allrecipes.com


Tuesday, November 25, 2014

Pumpkin Roll {with step-by-step picture tutorial}


I love the way food brings family together.  And speaking of together, this exact Pumpkin Roll recipe was the one that was served at my parents wedding reception (see pictures below) back in 1984, we they were brought together forever.  Both my grandmothers and my mom helped make tons of these to serve at the wedding reception.  This recipe is meaningful to me because of that, but not only is it sentimental it tastes divine.  

Have you ever had a pumpkin roll?  If not, let me just tell you what they are all about.  The cake-y layer is made up of a moist spiced cake made from scratch.  Then it's filled with creamy rich cream cheese frosting and rolled up.  It's very elegant looking and it sure to please the kids and adults.  My 4 year old daughter loves anything spiral, becasue she think it looks cool.  I have to admit, I love that too.  There is something about that swirly look that gets you and you just want to eat it around in the spiral.  Kind of like Cinnamon Rolls are for me.  I like to save the center for the late bite becasue it's the most tender.  Mmmm.  

I've included step-by-step instructions on how to make this. It's different than any other dessert I make, but it's not hard.  

I think these are perfect to serve in the Fall and Winter.  And in case you aren't a pie person or want something special besides pie for Thanksgiving, this should do the trick. 

I just had to include some pictures from my parents wedding day.  I love these pictures! I'm so glad my parents are together forever!  Love you Mom & Dad!


The recipe is down below.  Here is a handy picture tutorial.

After mixing the cake batter you'll generously sprinkle powdered sugar on a clean flour sack towel. 
 
You'll grease the pan with butter and line it with parchment leaving a inch or two over hang on both ends. Butter the top side of the parchment as well. This cake is not going to stick. :)


 When the cake is done, you'll immediately turn it over onto the powdered sugar towel.  

 Then you'll lift the pan off, being careful not to burn yourself. 

Then carefully peel the parchment off, it shouldn't stick really, you had lots of butter on that pan and on the parchment paper.

 
Then you'll start rolling up the cake with the towel on one of the short sides . Fold the end over before you start. 

 Keep rollin'.

 Once it's all rolled up let it sit for 10 minutes. 

During those 10 minutes add the powdered sugar, butter, cream cheese, vanilla and dash of salt in a medium size bowl.

Using a hand mixer whip the frosting until smooth and creamy.

 When the 10 minutes are up start carefully unrolling the towel.  

 Once it's all the way unrolled you'll see that it has some shape to it from cooling in a spiral. 

 Dollop the frosting on top. 

 And spread evenly all the way across the cake.

 And start rolling it back up again.

Place the beautiful pumpkin roll on some waxed paper or parchment paper and roll up. This will help it not stick to the wrapping. 

 Then wrap in foil.

And put it in the fridge next to your jalapeno pepper and let it chill for at least a few hours. It also freezes well if you want to make it ahead of time and take it out to thaw. 


Sprinkle additional powdered sugar on top if you desire. Cut by tying with dental floss in the size sections you want. And enjoy!

Pumpkin Roll

Printable Version {Click Here}

Yield: 1 pumpkin roll
*Notes: You can bake this in a 10x13 jelly roll size pan or in an 11 x 17 half baking sheet size.  The directions below indicate the bake time and temp for an 11 x 17 - if you want to do the jelly roll size - follow all the same instructions but bake at 375 for about 12-15 minutes. This also freezes great if you want to make ahead and then thaw before serving.
Ingredients:

3 eggs
1 cup white sugar
⅔ cup pumpkin puree
1 teaspoon lemon juice
¾ cup all-purpose flour
1 teaspoon baking soda
½ teaspoon nutmeg
2 teaspoons cinnamon
½ teaspoon salt
1 teaspoon ginger
----------------------------------
6 ounces cream cheese, softened to room temperature
4 tablespoons butter, softened
1 cup powdered sugar
½ teaspoon vanilla
dash of salt
Powdered sugar for dusting (optional)

Directions:

Preheat oven to 350 degrees (see note above).  Grease a 11 x 17 baking sheet with butter and line with parchment paper so that it overhangs on the short ends a few inches on each side. This will make for easy removal.  Butter the top of the parchment as well.

In a medium size mixing bowl beat 3 eggs. Add the sugar, pumpkin and lemon juice and mix until smooth.  

In a separate bowl combine the flour, soda, nutmeg, cinnamon, salt and ginger; whisk until combined well.  Gradually add to the wet mixture and stir until combined, taking care to not overmix. Pour mixture into the well greased and lined baking sheet and smooth evenly.  Bake for 12-14 minutes or until you can insert a toothpick and only a few moist crumbs.  While the cake is baking lay a clean flour sack towel on your counter and sprinkle generously with powdered sugar in an area that is as at least as big as the pan. After the towel is ready start prepper the cream cheese filling.  

In a medium size bowl combine the cream cheese, powdered sugar, butter, vanilla and salt.  Whip with hand mixer until smooth and creamy and set aside.  

When the cake is done immediately dump it onto the coated towel and start rolling up on one of the short ends.  Let it set for 10 minutes.  After the 10 minutes unroll the towel gently and spread the entire cake with the filling and start rolling it back up on the same end you started with before.  

Once it’s rolled place it on wax paper or parchment and wrap it up, and wrap again in foil. This helps it so it won’t stick to the foil for easy serving. For best results; chill for several hours or overnight.  When ready to serve remove from wrapping (sprinkle with powdered sugar if desired) and tie with dental floss to cut. Enjoy!

Recipe Source:

Lightly adapted, from my Grandma, Kathy K, made changes to baking temp and time and pan size.  This was served at my parents wedding reception.