Recent Posts

Related Posts Plugin for WordPress, Blogger...
Showing posts with label Beef. Show all posts

Monday, January 22, 2018

Shortcut Cheesesteak Subs

If you've been around here very long, it's no secret that we love Rhodes Artisan French Rolls.  They just step-up our dinner game that much.  Last week, we took our favorite cheese-steak filling and served it on these rolls instead of the standard hoagies we usually use.  They were SO good.  

We started by letting the rolls thaw (either at room temperature if you plan ahead, or by following the microwave directions on the bag).  Then we split them open and toasted them under the broiler.  Take them out, add the meat mixture and cheese and return to the broiler until the cheese has reached melty perfection.  Divine! And on the table in under 20 minutes--we call that a dinner win!


We like to serve these with a salad, fruits and veggies, or some roasted potatoes for a fast and filling dinner!

Shortcut Cheesesteak Subs
Ingredients:


2 tablespoons butter
1 onion, halved and sliced into thin half moons
2 garlic cloves, finely minced
½-¾  teaspoon dried oregano
3-4 tablespoons A-1 steak sauce
1.5 pounds deli roast beef, cut into 2-inch strips
Salt and pepper
1 bag Rhodes Artisan French Rolls (12 count)
2 tablespoons olive oil
12 slices provolone, swiss, or havarti cheese

Directions:


Preheat the broiler to low.  Allow rolls to sit at room temperature to defrost while you prepare the filling.  In a 12-inch skillet, melt 2 tablespoons of butter and add sliced onion.  Saute, stirring occasionally until onions begin to caramelize.  Add garlic and oregano and continue to cook for 1 minute.  Add in sliced roast beef strips, A-1 sauce, and salt and pepper.  Use tongs to stir together until mixture is heated through and well combined.  Remove from heat.  

Prepare the rolls for toasting by splitting them open.  (If they are still too frozen, follow the microwave directions on the bag to defrost them).  Lay the split rolls cut side up on a baking sheet and brush lightly with olive oil.  Place under broiler for 3-5 minutes or until they are as toasty as you like.  Remove pan from oven.  Place ½ slice of cheese on top of each roll half.  And spread the meat mixture evenly among the 12 sandwiches.  Return to broiler and broil for 2-4 minutes or until cheese is melted.  Serve Immediately.  

Notes:


Any leftover sandwiches can be wrapped in foil and reheated in a 350 degree oven for 15-20 minutes before serving.

Recipe Source:


Adapted from Mel’s Kitchen Cafe

Wednesday, March 29, 2017

Lightened-up Beef Stroganoff


We love stroganoff at both of our houses! It's been a classic comfort food since we were kids!  In case you haven't had anything but the boxed version - no worries. This can be made in 20 minutes. Choose ground beef or sliced round steak - mix a few pantry staples together and wa-lah! Dinner is served.  Our kids love it too, and when there are no complaints at dinner - all is well! 

Check out the recipe - we're sharing it at Or So She Says. 


Wednesday, October 14, 2015

Yummy Mummy Pretzel Dogs

We are half way through the month of October already and if you're like me, you might already be thinking of something spooky to serve for dinner on Halloween.  We have a long-standing tradition in our family of eating something fun and festive on Halloween night and these little guys will be making another appearance on our menu this year.    

These mummy dogs, a festive twist on these oh-so-delicious pretzel dogs, are sure to please both young and old this season.  The kids love to help with them, which is always a plus...unless you don't like sweeping flour off your kitchen floor.  ;)


We're sharing the recipe over at Or So She Says today, so head there to read the full post and to grab the printable recipe.  If these make it on to your holiday menu, send us a picture or come back and tell us about it! We love to hear from our readers!


Thursday, October 16, 2014

{Our Favorite} Taco Meat

Good old tacos.  In one form or another they make an appearance at our house at least monthly.  They probably aren't really something you need a recipe for, but Linds and I both thought this idea was worth sharing.  I've been making them with the addition of beans and tomatoes for about a year now, and I won't go back.  The beans make the meat go a bit further so you can put a hearty scoop of meat on your taco without eating 1/2 of a pound of beef.  

We really like these with ground turkey and black beans, but make them with your favorite combination of meat and beans.  On busy nights, I make this in advance and throw it in the crock pot on warm until we are ready to eat.  It is perfect for taco salad and I often send any leftover filling along with some tortilla chips for the hubby's lunch.  I also put it in my kids' quesadillas to make "taco-dillas" and they gobble them right up.  It's pretty versatile and darn right delicious!

{Our Favorite} Taco Meat | Leesh & Lu's Recipe Box


{Our Favorite} Taco Meat


Ingredients:

1 pound lean ground beef or turkey
1/2 medium yellow onion, diced (optional)
1 can black beans, drained and rinsed (use your favorite kind--they are pictured here with kidney beans)
1 can diced tomatoes and their juices
Taco Seasoning--use a packet or Lu’s recipe
Salt and Pepper, to taste

Directions:

Cook meat and onion in skillet over med-high heat until meat is fully cooked.  Season with salt and pepper, to taste.  Add beans, diced tomatoes, and taco seasoning.  Cook 5 min more.  Serve immediately or keep in crockpot on WARM until ready to serve.  


{Our Favorite} Taco Meat | Leesh & Lu's Recipe Box

{Our Favorite} Taco Meat | Leesh & Lu's Recipe Box


Tuesday, October 14, 2014

Homemade Meatballs {For Spaghetti & Sauce}


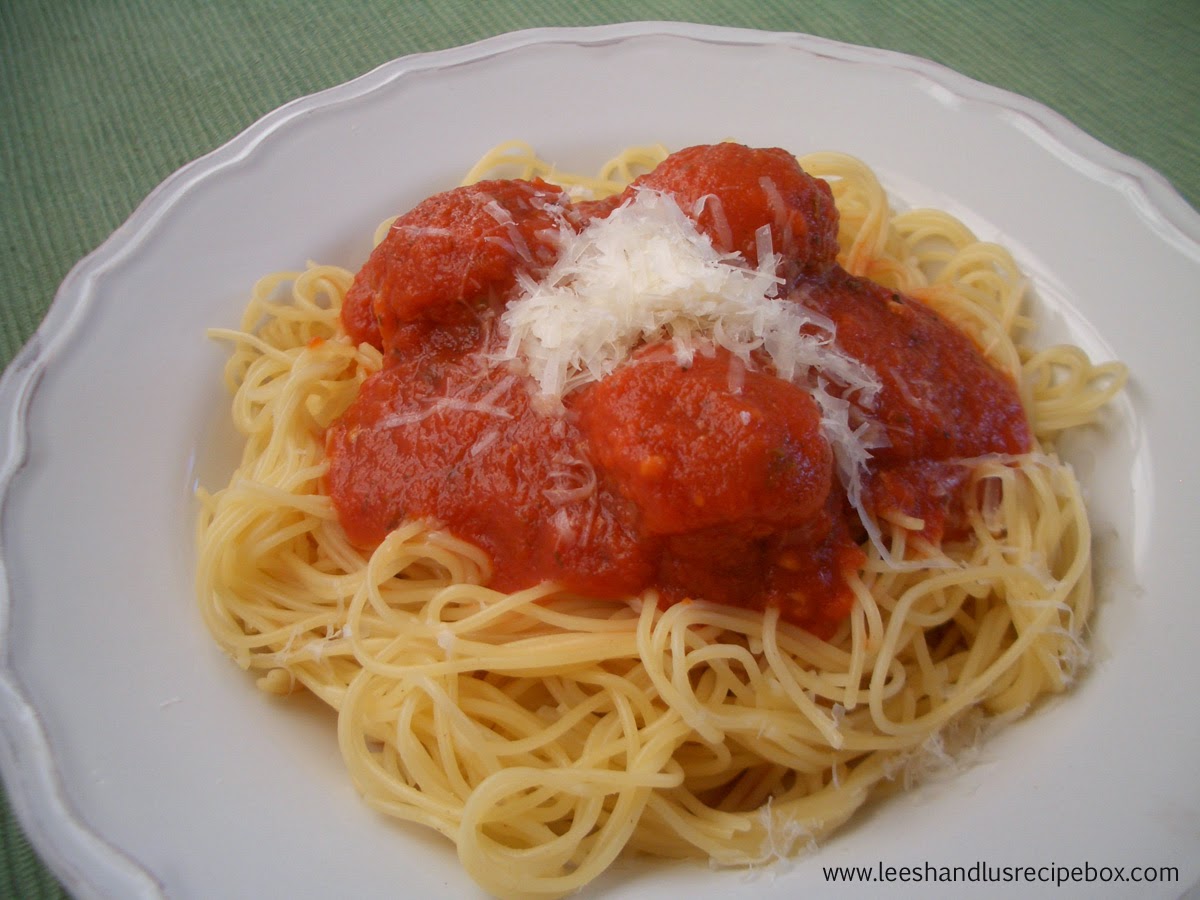
Spaghetti & Meatballs | Leesh & Lu's Recipe  Box

If I ever ask my husband what he wants me to put on the menu, 98.5485% of the times he requests Spaghetti. But when we were first married we always made it with ground beef in the sauce, and that was something I couldn't do when pregnant the first time around. I will spare you the details. After that I had a aversion to ground beef mixed in the sauce.  However, Steven kept requesting it and still does.  So I decided we need to go with meatballs.  So after trying and trying several recipes, I finally created my own variation that we love.  This is the only way I like to eat Spaghetti now! And to be technical it's always Angel Hair pasta, I like it more than Spaghetti. 

Spaghetti & Meatballs | Leesh & Lu's Recipe  Box 

These meatballs are waaaaaay better than any frozen meatballs you can find in stores.  And my favorite thing about making these, is I usually make enough for 3+ meals, so I freeze my own for quick/easy future dinners. When I can do this with any meal that we love it becomes an instant favorite!  Having those frozen meatballs in the freezer on nights that I just don't want to cook or don't have time is a lifesaver!  I simply heat them in my favorite spaghetti sauce on the stove and there are done in about the time the pasta is! It's easy, simple, fast, and tasty!  Those are 4 things I just NEED sometimes!   We like to serve the Spaghetti and meatballs with these bread sticks and a green salad.

I hope you enjoy!

Spaghetti & Meatballs | Leesh & Lu's Recipe  Box

Homemade Meatballs {For Spaghetti & Sauce}


Ingredients:

1 pound ground beef
1 pound ground turkey
4 slices of bread, broken into small pieces
⅔ cup buttermilk
2 cloves garlic, minced
1 teaspoon salt
1 teaspoon oregano
1 teaspoon basil
½ teaspoon black pepper, fresh ground
1 egg
½ cup parmesan cheese, grated
Cooked pasta (spaghetti or angel hair)
Spaghetti sauce (my favorite is Hunt’s Garlic and Herb)

Directions:

1. Break bread slices into small pieces and place in a large mixing bowl. Mix bread pieces with buttermilk to form a paste.  Add the garlic, salt, oregano, basil, black pepper, egg, and parmesan, to the bread mixture and stir until smooth.  

2. Add the ground beef and turkey to the mixture and mix with a large fork or with your clean hand (I like to use disposable kitchen gloves so I don’t have to this all over my hand) until it’s mixed well.  

3. Form meatballs into 1 - 1½ inch balls and place on a foil lined and greased baking sheet.  Bake at 375 degrees for 20-30 minutes, turning once about halfway through. Test meatballs for doneness with a meat thermometer. They should reach at least 170 degrees F.

4. Heat your favorite pasta sauce and add the cooked meatballs and heat until hot.  Serve over cooked pasta.  

Notes:

You can also cook them in a large nonstick skillet on the stove until done. I prefer doing the oven for ease and less babysitting.  I add the spaghetti sauce when they are done and simmer until hot.

We enjoy serving this with bread sticks and a green salad. 

Source: Leesh & Lu's Recipe Box, by Lu, with inspiration from ATK & yummly.com

Monday, August 11, 2014

Taco Dogs


I spied this recipe from the Taste and Tell Blog a few weeks ago and immediately added them to my menu plan. 

Taco style hot dogs is a great twist to the classic all American hot dog (bun, dog, mustard, ketchup and some optional relish).  I am a huge fan of homemade guacamole and salsa and thought these two things I love would definitely make any hot dog better!  And they sure did!  I loved all the extra flavor and fun that came with this idea of a taco dog!  Grilling the tortilla just enough to melt the cheese and give it a light crisp was the perfect touch.  

Summer isn't over yet, so hopefully you'll have time to enjoy these this year! 


Taco Dogs

Ingredients:

8 hot dogs, grilled
8 6-inch flour tortillas
Cooking spray

Taco dog toppings:
red onion or green onion, chopped
1 tomato, seeded and chopped
Cilantro, chopped
Olives
Any other taco toppings you love
1 ½ cups shredded cheddar cheese

Directions:

1. Prepare toppings

2. Heat grill over med-high heat and grill hot dogs until done.

3. Top each tortilla with guacamole, and salsa then the grilled hot dog, top with onion, tomato, cilantro, olives and lastly cheese.  Press the cheese together to kind of seal the tortilla shut.
4.  Lightly spray each side of the taco dog with cooking spray and grill over medium heat until the cheese melts and you have some light grill marks on your tortilla.  

5. Dunk in more guacamole and salsa and enjoy!


Serves: 8 - one taco dog per person

Monday, January 14, 2013

{Baked} Beef & Bean Taquitos


Last week I posted a recipe for {Baked} Creamy Chicken Taquitos. Between the chicken taquitos and the {Baked} Beef & Bean Taquitors I'm sharing today, these are two recipes that appear on our dinner menu every month.  I like them because they are easy, healthy, TASTY and pretty slick to make.  My husband says he prefers these over the chicken ones. But for me it's kind of a toss up. I like them both A LOT!

The filling of the taquito is mainly beef, bean and cheese.  The spices, onions, and garlic give it the perfect "pop" to make your tastes buds happy! 


Last week I mentioned that my 2 year old loves the chicken taquitos. She also loves these beef and bean taquitos. And still 3 or months in a row this is the ONLY kind of thing she will eat meat in! So maybe that is one more reason why these little beauties appear on our dinner table more than once a month. I like to scramble the beef really fine. The fine bits of cooked beef mixed with the bean and cheese is easy for my little lady to eat - and I like it that way too. My daughter usually asks for more after devouring a whole one! I love when I can get her to eat something good for her!

We enjoy these dipped in salsa, sour cream, and/or guacamole!

I hope you'll love them as much as we do!


{Baked} Beef & Bean Taquitos
Printable Version
Ingredients:
1 pound ground beef
3 cloves garlic (or 1 teaspoon garlic powder)
⅓ cup onion, diced
¾ cup refried beans
3 tablespoons cilantro, chopped
2 green onions, chopped
½ teaspoon cumin
⅛ teaspoon cayenne
¼ cup red or green salsa
1 cup monterey jack cheese, grated
small flour or corn tortillas (I prefer the flour since I love them, and always have them on hand)
kosher salt
cooking spray

Directions:
Pre-heat oven to 375-400 (my oven is pretty hot, so I do 375) and line a baking sheet with foil and lightly spray with cooking spray..

In a skillet cook ground beef with onion and garlic until no longer pink and cooked thoroughly.  Drain excess fat and add to a medium-sized mixing bowl.  Add beans, cilantro, green onion, cumin, cayenne, salsa, and cheese. Mix until combined well.

If you are using corn tortillas work with only a few at a time. Do this by heating them in the microwave until they are soft enough to roll without cracking. It is helpful to place them between damp paper towels. 20-30 seconds should be enough time. If they are cracking, try heating them just a little warmer.  If you are using flour tortillas there is no need to do this. I usually use the uncooked flour tortillas (they taste much better, I think), so I quickly brown them before filling them. I’ve do it without doing this and it doesn't turn out as good since the bottom where the tortilla will overlap when rolled doesn’t cook crispy like the rest of the taquito.  But if you are in a hurry you can use uncooked tortillas. 

Scoop 2-3 tablespoons of the beef mixture and place it on the lower third of each tortilla, keeping it about ½ inch from the edges. And then roll it up as tight as you can.

Place the seam side down on the baking sheet. Lay all of the taquitos on the baking sheet and make sure they are not touching each other. At this point you can stick them in the fridge and keep them there until dinner time. I do this a lot so I can have a quick meal come dinner time.  Before baking, spray the top of each taquito roll lightly with cooking spray and sprinkle some kosher salt on top.

Bake for 15-20 minutes or until crisp and the ends start to get golden brown.

Dip them in salsa, sour cream, guacamole, etc. I like sour cream mixed with salsa! :)

Makes 8-10 on flour tortillas, and more like 12-16 on corn tortillas.

Freezer Meal Note: 
I assemble these the same as the recipe except for I don't spray them with grease or salt them.  I like to freeze them until solid on a foil or wax paper lined cookie sheet and then transfer them into a gallon-size freeze bag and freeze til ready to use. The day I want to use them I pull them out and put them on a greased foil lined cookie sheet for easy clean up - and let them thaw in the fridge if I think about it in the morning, or I let them thaw on the counter an hour or two before I want to bake them.  When they are ready to bake I lightly spray them with spray grease and sprinkle a little bit of kosher salt on them and bake as directed in the recipe.  
Recipe Source: Leesh & Lu's Recipe Box, by Lu
 

Tuesday, March 6, 2012

Brazilian Feijoada {Black Bean & Meat Stew}


Feijoada (pronounced fezsh-wah-da) is a stew of beans and meat that is served in a Brazilian cuisine. This particular recipe comes some some of our friends, Danny & Marie. Danny is from Brazil and kindly shared this recipe with us. We were privileged to try it made by his wife, and now we're hooked! Often times when I ask Steven what he'd like on the menu, this dish is one he'll request.

It's amazing to me what flavor this dish has, the ingredient list isn't too complex, and the flavor is amazing. Cooked in a crock-pot, this dish is one of those easy, throw together meals that will please any crowd or company!

I am no professed Brazilian cook, but this Feijoada and Pão de Queijo (a Brazilian cheese puff bread) are two dishes that have been incorporated into our family menu that will stay forever! I will be posting hot to make Pão de Queijo in a few weeks, so stay tuned!


If you haven't tried Brazilian food, this is a great recipe to start with! And in the words of Danny, "Enjoy this manna from heaven (Brazil)!!!"


Brazilian Feijoada {Black Bean & Meat Stew}
(pronounced fezsh-wah-da)
Printable Version

1 pound dried black beans
1 pound diced ham (fully cooked)
1-2 pounds total 100% beef polish sausage, fully cooked (Hillshire Farms is a good brand)
½-1 yellow onion, diced
3-5 cloves garlic, minced
2-3 bay leaves
1 teaspoon salt

Rinse and sort beans. Soak beans in water, covering beans by 1-2 inches, overnight in 6 quart crock-pot. In the morning mix everything except the sausage, into the crock pot with water enough to cover ingredients by 2-3 inches. Cook on low for 4-5 hrs, adding water if needed. Slice sausage and to crock-pot, and cook for another 4-5 hrs. The longer it cooks, the softer and tastier it will be.

Remove bay leaves. If desired, thicken sauce by mashing or blending ½ cup of the beans, then add back into mixture. Serve Feijoada on top of rice. For the ultimate experience, heavily sprinkle the Feijoada with manioc flour (manioc flour is made from a South American root. The best source for manioc flour is a Latin American market/store. It may also be labeled tapioca flour, polvilho, yucca, or cassava flour. Manioc flour is gluten free.)

Recipe Source: Danny & Marie P., some of our dear friends

This is the original photo, new photos updated 4/6/16
It's fun to see how my food photography changes along the way. 

Friday, October 28, 2011

Super Nachos

I'm not sure I can even call this a real recipe, but it's a super easy, super fast dinner idea.  I think everyone needs some of those to stick in their back pocket!  I like to pair this with mexican rice or a green salad.


Super Nachos
Tortilla Chips
1 lb ground beef
Taco seasoning (Use store bought or make your own)
2 cups grated cheddar or colby jack cheese
Diced tomatoes
Sliced olives
Avocado or guacamole
Sour Cream
Salsa...or any other toppings you can dream up.  My friend, Haylee, even makes them with grilled chicken.

Preheat oven to 375.  Add salt and pepper to ground beef and brown.  Drain fat and rinse if desired.  Season with taco seasoning according to package directions.  Arrange tortilla chips on a lined baking sheet.  Be careful not to let them overlap too much, or you won't get enough cheesy goodness on each chip!  Sprinkle 1/2 cup cheese on top.  Top with all desired topping and finish off with remaining grated cheese.  Keep a close eye on them for about 5 minutes in preheated oven or until the chesse is a melty as you want it.  We like to dip ours in sour cream, salsa, or cilantro-ranch dressing.

Note:  I mixed all the toppings in with some cooked macaroni for my little guy since he can't chew tortilla chips yet.  He loved it!

Monday, October 17, 2011

Classic Chili

I think I've only made one good Chili before trying this recipe. In the past I've just whipped up something kind of random and called it Chili. But after tasting this Chili, I know that my past in-a-hurry-Chili-whip-ups were not Chili at all. They weren't even half as good as this stuff.

The way I prefer my Chili is like this: Mostly beef and tomatoes, some beans, a slight sweet and mildly spiced flavor, and I like it somewhat thick, but still a bit soupy. That is just what this recipe is all about! It's all of those wonderful things. And it's easy and does not call for any absurd ingredients. Severed with a hot slice of cornbread and slather of butter, it's simply perfect.

After making this marvelous Chili I have come to realize that a long simmer really does bring out the flavor. The slow simmer helps marry all the flavors together, producing a very satisfying bowl of homemade Chili.

Oh man, I don't know what else to say, but you gotta try this!

Classic Chili
Printable Version
Serves 8

2 pounds lean ground beef (I like 93% lean)
2 yellow onions, chopped
4 cloves garlic, minced
2 tablespoons chili powder
2 teaspoons salt
2 teaspoons dried oregano
4 (14.5 ounce) cans stewed tomatoes or 2 quarts home canned tomatoes
1 (8 ounce) can tomato sauce
1 (15 ounce) can kidney beans, drained and rinsed
1 (15 ounce) can great northern beans, drained and rinsed

Combine ground beef, onion, and garlic in a large stockpot. Cook and stir frequently over medium-low to medium heat until beef is brown and juices run clean. Drain any excess grease off meat if you’d like.

Add chili powder, salt, oregano, tomatoes (if like to dice my tomatoes before adding to the stockpot. The reason it does not call for diced tomatoes is there is usually less tomato juice in the can/jar. You can also break up the tomatoes with your stirring spoon if you’d like), and tomato sauce. Heat to boiling, reduce heat to a gentle simmer, and cover. Cook, stirring occasionally, for 1 hour plus.

After the hour of simmering add beans and simmer uncovered for 20 minutes, stirring occasionally.

Serve warm: plain, or with grated cheese, sour cream, and chips, and/or cornbread.

Note: the key here is to simmer it at least the full amount of time called for, it really brings out the flavor and makes the chili all that it’s supposed to be.

Recipe Source: adapted from allrecipes.com by Michelle

Friday, October 7, 2011

Taco Soup

It is feeling more and more like fall each day this week. We even had snow on the foothills and mountain tops yesterday. Is it that way for everyone else? I am feeling a big soup fetish coming over me as the temperature cools and I try to stay warm.

This taco soup is one of our favorites (as with all the other recipes I post on this blog). We have this soup throughout the year, but I especially love a hot soup on a cold day, like today.


This recipe calls for all sorts of ingredients that I always have on hand (ground beef, onion, broth, canned tomatoes, beans, corn, tomato soup, salsa, and taco seasoning), so I can whip it up just about any old day, without making a run to the store. I also season it with my very own homemade taco seasoning, which gives is an extra warm touch.

This soup is great topped with your favorite taco toppings, such as: sliced olives, green onions, sour cream, grated cheddar, cilantro, and tortilla chips.

Enjoy!

Taco Soup
Printable Version
Serves about 10

2 pounds lean ground beef
1 (medium to large size) yellow onion, diced
2 (10 ounce) cans chicken or beef broth
2 (28 ounce) cans diced tomatoes
1 cup salsa (your favorite kind)
1 small can of tomato soup
1 cup frozen corn
1-2 (27 ounce) can kidney beans, drained and rinsed (depends on how much bean you like)
½ to 1 package of taco seasoning, to taste (or 2-4 tablespoons of this taco seasoning)

Toppings:
Sliced olives
Sliced green onion
Cilantro
Grated cheddar cheese
Sour cream
Tortilla chips

In large stock pot add diced onion and ground beef. Brown ground beef until juices run clear and it it thoroughly cooked throughout, onions should be clear and cooked through. Add broth, diced tomatoes, salsa, corn, beans, and taco seasoning and simmer for 15-20 minutes until hot. Simmering allows the flavors to intensify.

Note: I usually half this recipe except for the beans, I just use one can. This usually will feed my and my husband for dinner and give us about 3 lunch size helpings leftover. We also like to serve this with cornbread.

Recipe Source: Rosella B.

Wednesday, July 13, 2011

Beef & Cheese Wedges

Do any of you like the movie 'Elf'? I think it's pretty hilarious. I watch it every Christmas season. There are too many funny parts. I really love when Buddy tries to put the star on the tree and he jumps off the couch and leaps for the tree. It's really fun to watch that in slow- motion. But one line in this movie that I especially love is when Buddy is at the mall preparing for Santa to arrive. When he sees that Santa is not really Santa, he says, something like ....."You don't smell like Santa, you smell like beef and cheese." When I make these yummy beef and cheese wedges I always think of that line! Although you may not want to smell like beef and cheese, you'll love the taste of it. That is a promise!

This recipe comes from my mother-in-law. When Steven and I got married, I asked my mother-in-law for all the recipes she made that Steven loves. This is one of them, and now after making it several times since we've been married I know why he loves it!

It comes together pretty quick. I've learned a few helpful tips that I'll share in the recipe (below) that have sped up the process of putting it together. The flavors are mouthwatering, it has the perfect seasonings, a yummy, fluffy biscuit-like crust, and topped with cottage cheese and cheddar cheese, it's just simply, 'to die for'. Hope you'll enjoy!

Beef & Cheese Wedges

Printable Version

Crust:
1 egg yolk, beaten (you'll use the white in the topping)
1 cup biscuit mix (I make my own, see below for recipe, or you can use Bisquick, Jiffy or other baking mix)
3 tablespoons milk

Meat Filling:
1-1.5 pounds ground beef (extra lean)
1/2 cup yellow onion, chopped
1/2 teaspoon salt
1/2 teaspoon Italian seasoning
1/4 teaspoon pepper, fresh ground
1 clove garlic, minced

Topping:
1 egg + 1 egg white (should have one that you didn't use in the crust), beaten
2 cups cottage cheese (1 16-oz package)
1/2 cup cheddar cheese, shredded

Stir together egg yolk, biscuit mix, and milk. Form into a pie crust about 1/8 inch thick, and place into a 9 inch pie dish. The easiest way to make this into a crust is to grease with spray grease two sheets of plastic wrap. Place the ball of dough onto one of the greased sides of plastic wrap and place the other sheet greased side down, on top of the dough. Press it into a circle and with a rolling pin, roll it into a big circle, big enough to place in your pie dish.

Preheat oven to 375 degrees. In a skillet over medium-low heat cook beef, along with onion, salt, pepper, Italian seasoning and garlic. Cook until beef is browned and fully cooked. If there is an excess amount of grease drain in colander. When meat is cooked and drained pour it into the pie crust.

In a small bowl coming egg/egg white and cottage cheese, mix well. Pour this mixture over the meat mixture.

Bake in preheated 375 degree oven for 15-20 minutes, top with shredded cheddar cheese and bake 10 minutes. Let set for 10-15 minutes before serving. Cut into wedges and serve.

Recipe Source: Maureen G.

Homemade Biscuit Mix: (adapted from Better Homes and Garden Biscuit Recipe)

3 cups all-purpose flour
1 tablespoon baking powder
1 tablespoon sugar

1 teaspoon salt
3/4 teaspoon cream of tartar

Mix together and store in airtight container. I also use this same biscuit mix in my recipe for 'Crustless Blender Quiche'.

Monday, July 4, 2011

Cheesesteak Subs

These subs have appeared (not magically, of course) on our dinner table at LEAST twice a month (maybe more) since I've discovered their yumminess and simpleness. The original recipe calls for provolone cheese, which we love. But we've also made them with a spicy pepper jack and they were to-die-for. Either cheese is pleasing to my taste buds. What way will you make them?

These subs are made best with homemade sub rolls, which I posted a recipe for last week. I'm sure they'd be good on a store bought bun, but they will really knock your socks off if you have them on these homemade subs. Really, try them! They are soft and tender and when they are toasted to perfection (like this recipe calls for) it gives them the perfect crunch. I mentioned last week that I usually make a double batch of the rolls. I make some into rolls and some into subs. They freeze great and then I can have a quick tasty meal in minutes!

Cheesesteak Subs

Printable Version - with picture
Printable Version - text only

Makes about 4 sub-sandwiches

2 tablespoons butter
1 onion, halved and sliced into thin half moons
2 garlic cloves, minced
¼ teaspoon oregano
2 tablespoons A-1 steak sauce
1 pound deli roast beef, cut into 2-inch strips
Salt and pepper to taste (optional)
4 (6-inch) sub rolls, sliced open lengthwise
8 slices provolone or pepper-jack cheese

Preheat the broiler in your oven and adjust a rack to the upper-middle position.

Meanwhile, in a large skillet, melt the butter over medium-low heat. Add the onion and cook until soft and golden, about 8 minutes. Stir in the garlic and oregano and cook for a minute, until it smells fragrant, be careful to not have the heat to high or your garlic will burn. Add the A-1 steak sauce and the sliced roast beef. Stir well to coat the beef with the sauce and onion/butter mixture. Cook until the meat is heated through, about 2 minutes. Season with salt and pepper to taste (this is optional - and I have to admit I’ve never done it).

Place the sliced rolls on a baking sheet. Place an even amount of beef on each roll. Place sliced cheese on top of the meat. With the buns open, place in the oven on broil and broil until the cheese is melted, about 2 minutes - but don’t go far and check on them before 2 minutes. You don’t want them to burn. They are best when the cheese is melted and the top side of the sub roll is nice and toasted. Serve immediately.

Recipe Source: Mel’s Kitchen Cafe - www.melskitchencafe.com