Recent Posts

Related Posts Plugin for WordPress, Blogger...

Wednesday, October 23, 2013

Spider PB & Banana Sandwich

So this isn't technically a recipe, but it's a fun thing to do for your kids lunch around Halloween!  We made these today for lunch and my daughter had fun eating his legs so he couldn't crawl away, and proceeding to eat the rest of him as she evil-ly laughed "bahahaha, I'm eating you, spider!".  

She is pretty camera shy, but she was so excited to eat lunch today! Which was refreshing, sometimes meal time is a battle at this house.  

Happy Halloween! 


Spider PB & Banana Sandwich

2 slices of bread 
Peanut butter
Honey/Jam
2 raisins (for eyes)
1/2-1 banana (depending on how long of spider legs you want)
Circle cookie cutter 

Spread pb on bread and top with honey or jam.  Place 2nd slice of bread on top and then cut through the sandwich with the circle cookie cutter.  Place on plate and top with raisin eyes, and banana legs.  

Enjoy!  

Friday, October 18, 2013

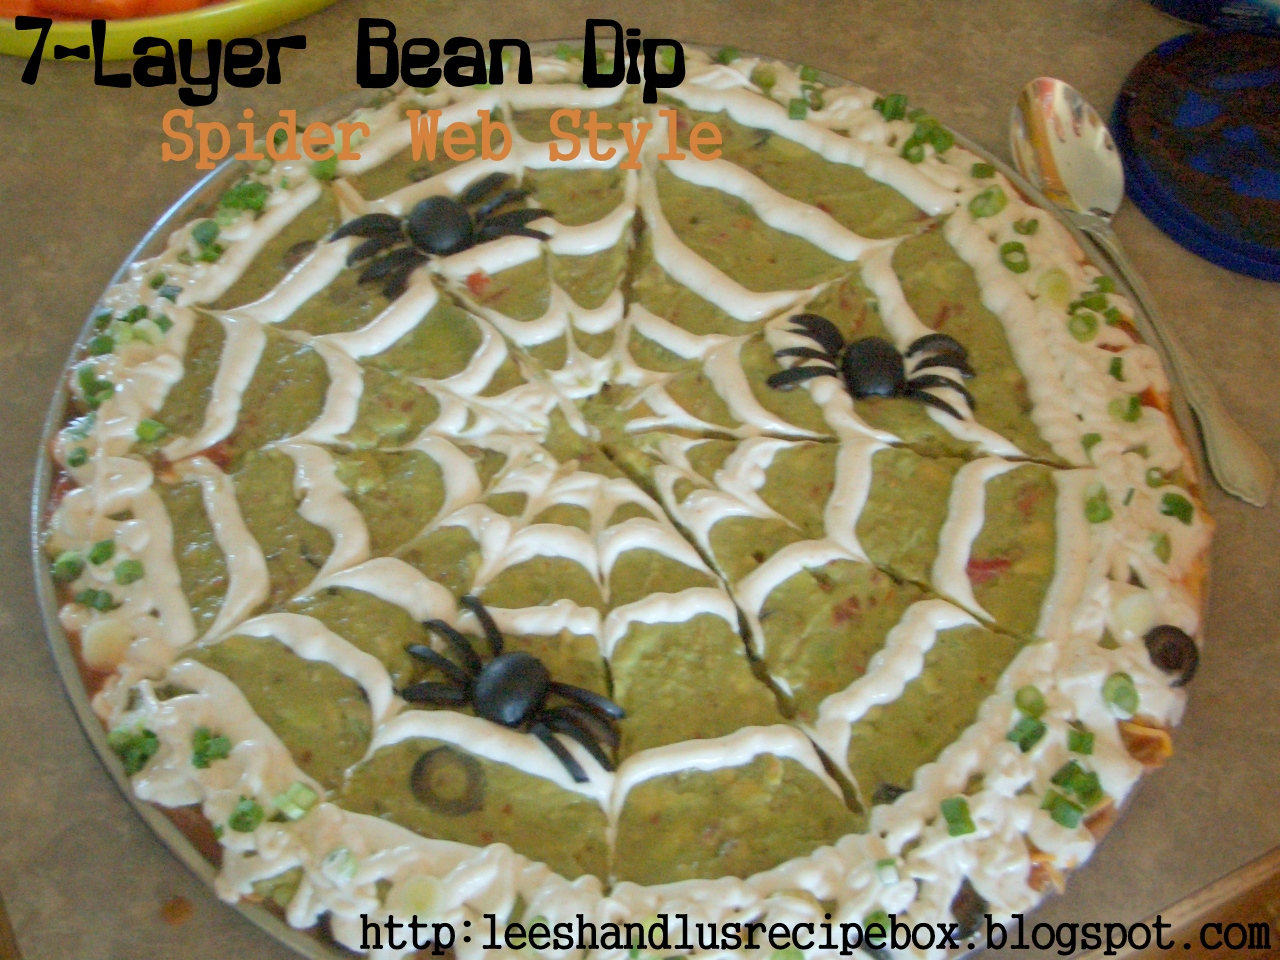
7-Layer Bean Dip {Halloween Edition}


To be honesty Halloween hasn't ever been one of my most favorite holidays. But in the last few years since we've had kids, we've made fun out of it.  This year I'm hoping my 3rd child isn't born on Halloween.  do love a fun family Halloween party, and we've had a few of those in the last few years.  I made this 7 layer bean dip 4 years ago for our first family Halloween party!  It was a hit! And 7-layer bean dip is a favorite at our house, so it was a win-win.  This was our first time dressing up as a family for Halloween, we were pirates! I think my almost 1 year old made the cutest pirate of all time!  


This bean dip recipe comes from my sister in law, Jayna! I'll indicate the order I generally layer the bean dip, and then also let you know what I did so that they spider web and olives would work for a Halloween-oriented bean dip. And this recipe really doesn't matter how much of each layer you have, just be generous with the layers and use whatever size dish you want and it will be great!

 
7-Layer Bean Dip {Regular or Spider Web Style}
Printable Version
Ingredients:


1) Refried beans, 1-2 cans
2) Guacamole (one recipe listed below, you can double if you want more)
    2 avocados
    ½ lime, juiced
    ¼ teaspoon garlic salt
    ¼ teaspoon onion powder
    ¼ teaspoon garlic powder
    ⅛ teaspoon cayenne (optional, but I don’t think it makes it hot, just adds flavor)
3) Sour cream (optional mix ins are: cayenne or taco seasoning to taste)
4) Cheese, grated (cheddar, sharp, colby, Monterey)
5) Chopped tomatoes (or salsa if you don’t like tomatoes)
6) Olives, sliced
7) Green onion, finely chopped


Directions:


I prefer to make guacamole cause it’s so easy and doesn't taste like preservatives.  To make it use 2 ripe avocados.  Start by smashing them into a small mixing bowl with a fork.  Add lime juice, garlic salt, onion and garlic powder and cayenne.  Mix until smooth and set aside until you are ready for it in the layers.  

Prepare the other layers of refried beans (open the can), grated cheese, chopped tomatoes, sliced olives and green onion.  You can layer this in a 9x13, 8x8 or a large platter.  There aren’t really any amounts listed because you can’t mess this up as long as you have all of the layers, you can do as much or as little of whatever layer you want.  

For Regular 7 layer dip the layering is listed above in the recipe.  1 being the bottom layer and 7 being the top layer.

For Spider-Web style bean dip this is the order.  
1) Refried beans
2) Green onions, reserve some for the border
3) Cheese
4) Tomatoes or salsa
5) Olives, a few reserved for cutting like spiders
6) Guacamole
7) Sour cream

For the spider web style, spread onto a metal or glass platter.  Spread refried beans and then layer with most of the green onion, reserving a few for garnishing the top outside border.  Then sprinkle with cheese, tomatoes or salsa, and most of the olives (save a few to cut like spiders. Cut one one olive in half lengthwise and use for a spider body, use the other half to make 4 legs and then cut another olive in half for 4 more legs - you can make as many or as few spiders as you want - just save them for the very top layer.).  Spread guacamole on top of the other layers. Bag your sour cream in a zip-lock bag (cut the corner to make a frosting like tube) or frosting bag and make circles on the top layer, starting small in the middle and getting bigger toward the outside.  I made a zig zagged edge on mine so that I could put more sour cream on the dip.  Use a butter knife, chopstick, or something similar to drag out the spider web, connecting the circles together.  Garnish edge with extra green onion, and then place spiders on the web as desired.  

Serve with tortilla chips.


Wednesday, October 9, 2013

Baked Mac & Cheese

This has become a favorite comfort food at our house.  Quick, easy, cheesy. Need I say more?


Easy Baked Macaroni & Cheese

Ingredients:


8 ounces elbow macaroni
4 tablespoons flour
4 tablespoons butter
2 cups milk
½ teaspoon salt
fresh ground black pepper, to taste
2 cups shredded cheddar cheese (I like mine extra sharp, but use your favorite)
½ cup seasoned breadcrumbs

Directions:


Prepare pasta as directed on package.  Preheat oven to 400.  Spray baking dish (8x8-ish size) with non-stick cooking spray.  
Melt butter in a large saucepan.  Add flour mixed with salt and pepper, using a whisk to stir until blended.  Cook for a minute or so and pour in milk gradually, stirring constantly.  Bring to a boil and boil for 2 minutes, still stirring constantly.  Reduce heat and cook (stirring constantly) for 10 minutes.  Gradually add shredded cheese and simmer an additional 5 minutes or until cheese melts.  Turn off flame.  Add cooked macaroni to the saucepan and toss to coat with the cheese sauce.  Transfer macaroni to a buttered baking dish and sprinkle with breadcrumbs.  Bake 20-25 minutes until the top is golden brown.  Serves 4.   

Notes:

 - I like to mist the top of the breadcrumbs lightly with cooking spray before I put it in the oven to help the breadcrumbs brown evenly and get extra crispy.  
- It's also super yummy with 1 cup chopped ham stirred in with the cheese sauce.
- If you want a creamy mac and cheese, skip the baking and the breadcrumbs.

Recipe Source:


Back of Reggano Macaroni Box


Friday, September 6, 2013

Granola Bars {w/ 5 suggested variations}


I've been seeing recipes for homemade granola bars a lot lately. I hadn't really thought much about making them until I tried these at my friends house a few weeks ago! And they were sooooo good. I'm not usually a huge granola bar person.  But these are something else!  They taste so pure and wholesome and I love making them because I know what goes into them (I can pronounce all of the ingredients) and they are adaptable to whatever taste you want to get out of them.

Wednesday, August 28, 2013

Lime Slushies

I kind of really feel bad that I haven't shared this recipe before! We love to make these lime slushies in the summer, and I think we've been making them lots more this summer since I am one hot prego lady all the time.   I love how light and refreshing they are! They can satisfy my sweet tooth as well as cool me off and refresh me!

It's still summer, so don't delay! Enjoy a lime slushie today!  (I love it when I rhyme.)


Lime Slushies

Ingredients:


1 lime (half the zest and all the juice)
⅓-½ cup sugar
3 cups ice cubes
1 ½ cups cold water


Directions:


Place lime zest, lime juice, sugar and ice in the blender. Pour cold water over and blend til smooth. It’s best with no big lumpy ice chunks.  Blend 1-2 minutes. Serve immediately!

Recipe Source: Diana K.


Thursday, July 11, 2013

Tuna Salad {Summer Meal with NO-OVEN}

Why, hello! It's been a while.  If you want to hear my excuses, they are: 1) I'm pregnant and 2) we just moved to New Mexico. With those 2 factors life has been crazy for the last several months to say the least.  But I still love doing this recipe blog, and am determined to be back at it again weekly.  Enough about that.  

The real reason I'm here today is that I've been on a quest to not turn my oven on this summer.  I'm sure several of you feel like this is an important thing too during the heat of the summer.  We are living in New Mexico now and the heat isn't really much different than Utah, but we are on a swamp cooler system now vs air conditioning.  So far I'm not a huge fan of the swamp cooler.  I mean, I'm happy that I have it, cause nothing would be worse. But I used to turn the A/C to like 68 or so, and bask in my frigid cold house, and now that is not so much a possibility.

So as I was brain storming some NO-OVEN meals. This tuna salad came to mind. My mom made this for us growing up and I have always loved tuna!  This salad comes together quick, about 30 minutes and is best chilled. I usually make it while I'm eating/making lunch and then let it sit until dinner time in the fridge so it's nice and cold.  And I had everything on hand in my barely moved into house, except for fresh celery.  So you probably have all the ingredients on hand too.

I don't really have exact amounts on my recipe. But I recorded what I did yesterday when I made this.  It's really a flexible salad, you can add more or do less of anything.  So easy! Enjoy!


Browse our recipe index for other NO-OVEN meals!

Tuna Salad
Ingredients:


2 heaping cups of pasta, cooked & drained (I like mini shells, elbow, or mini rotini)
1-2 small cans tuna (light tuna or albacore)
2-3 stalks of celery, diced small
¾ cup kosher dill pickles, diced (I like Vlasic brand)
4 hard boiled eggs, diced
¾ + cup mayo (pick your dressing scale, I like it light)
1 teaspoon Mrs. Dash seasoning (or other saltless seasoning blend)
¼-1/2 teaspoon celery seed
Fresh ground pepper to taste.  


Directions:


Cook pasta, drain and rinse.  Add to a large bowl with lid (or that you can cover with plastic wrap). Boil 4 eggs til done (I boil them in white vinegar, water and salt for 10 minutes).


Add all ingredients to the same mixing bowl and mix until combined.  Chill for 3-4 hours for best result.  
Note:

I usually like to make this at lunch time so that it can be very chilled for dinner.  If I’m short on time I just cook the noodles and eggs and put them along with 2 cans of tuna in the fridge (all the other ingredients besides the seasoning I already have refrigerated), so everything will be cold for mixing right before serving.

Enjoy!

We serve with artisan bread and fruit salad.

Thursday, April 11, 2013

Crispy Oven Baked Chicken {Any Cut}


Let's not talk about the fact that it's been just over 2 months since our last  post. Ahhh!  Life has been busy for both Leesh and I.  I didn't just have a baby, but I have some excuses, but I won't bore you with them.

Anyhow, let's cook!  I spotted this recipe on pinterest a while back, made a few tweaks, made it for dinner tonight, and am posting it tonight.....that's how good we thought it was.  I had to share!

You can use this coating for the chicken on any cut of chicken. We chose legs, which take a bit longer time to bake, but they were OH.SO.TASTY!  I served them with Whole Wheat Dinner Muffins (if you haven't tried these yet you've got to, no yeast and seriously as yummy as a fresh roll), and a green salad with feta, dried cranberries, and Italian dressing. Yum-o! 

This was so easy to throw together and gave me time to clean the kitchen and make muffins and salad while the chicken baked.  It was perfect. You dip the chicken in an egg/milk mixture and coat it in a mixture of crushed corn flakes, Parmesan cheese, garlic powder, pepper, and Bon Appetite seasoning salt (by McCormick).  The bon appetite was the tweak I made, the original recipe called for a ranch seasoning packet. 

Let's bake some chicken!


Crispy Oven Baked  Chicken {Any Cut}
Printable Version
Ingredients:


8 boneless skinless chicken breasts, sliced into strips - {I used 8 chicken legs}
1 cup crushed corn flakes
¾ cup Parmesan cheese, grated
½ teaspoon garlic powder
½ teaspoon black pepper
1 ¼  teaspoon bon appetite seasoning salt (McCormick brand) OR 1 package hidden valley dry ranch dressing mix
1 cup milk
1 egg


Directions:


Pre-heat the oven to 350 degrees. Line a 13×9 inch baking dish with aluminum foil and spray with spray grease (easier clean up).  In a shallow dish combine crushed corn flakes, parmesan cheese, garlic powder, black pepper, and  bon appetite seasoning salg (McCormick) OR dry ranch dressing mix. In a small bowl beat together eggs and milk.


Dip each chicken strip into the egg/milk mixture and then roll in the crushed corn flakes/ranch dressing mixture. Repeat until all chicken strips are well coated.


Place onto a greased baking sheet and bake uncovered for 30 minutes or until the chicken is cooked through (the internal temperature has reached 165 degrees). If doing legs/drumsticks bake for 50-60 minutes or until internal temperature is 185 degrees, and cover for at least 30 minutes of the baking to avoid over browning.  

(Makes 6 Servings)

Recipe Source: Blogchef.net via pinterest